


8
INSTALLATION
GENERAL INFORMATION
Remove the shipping carton. Make sure the unit is not damaged. Lift the top louver and remove
three (3) nuts at the upper left, right, and center of the glass frame. Also, open louver at bottom
and remove the three (3) nuts. Set the door aside and protect from inadvertent damage. Retain
nuts for reassembly. Next, carefully remove the box of logs inside the appliance and set these
aside.
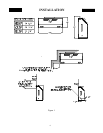
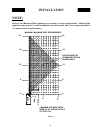
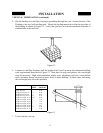
1. Framing - Maintain dimensions for the appliance enclosure as illustrated in Figure 1.
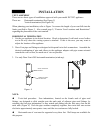
2. Gas Supply - These units are equipped with pipe supply access holes at the right side and
right rear facing unit.
3. Position appliance into framing - DO NOT secure with nails at the nailing tabs at top front
corners until venting installation is complete.
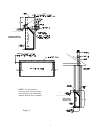
4. Vent system — NOTE: (The Model No. DV23ZC must be vented using the Simpson-Dura-
Vent Direct Vent Gas 4" inside 6" venting system.) All warranties will be voided and
serious fire, health, or other safety hazards may result from any of the following actions:
Installation of any damaged components not manufactured or approved by Simpson-Dura-
Vent; failure to meet all clearance requirements; failure to properly twist-lock and seal all
components.
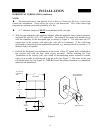
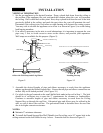
Each section of Dura-Vent-GS flue system must be properly sealed to prevent the possibility of
leakage. This is accomplished by using high temperature silicone sealant. Apply a bead of
sealant around the bell section of the inner pipe prior to joining the pieces together. The outer
pipe joint may be sealed with metal foil tape or with silicone sealant.
WARNING
Always maintain required clearances (air spaces) to combustibles to prevent a fire hazard. Do
not fill air spaces with insulation. Check installation instructions for minimum clearance
requirements between the outer walls of the vent pipe and nearby combustible surfaces. Be sure
to check the vent termination clearance requirements from decks, windows, soffits, gas
regulators, air supply inlets, and public walkways, as specified in these installation instructions
and local building codes. (See page 9.) The gas appliance and vent system must be vented
directly to the outside of the building, and never attached to a chimney serving separate solid
fuel or gas burning appliances. Each direct vent gas appliance must have its own separate vent
system. Common vent systems are prohibited.
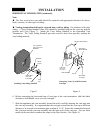
5. Remote Wall Switch or Thermostat or Remote Control - This appliance can be switched on
or off using one of several devices: 1). Appliance ON/OFF switch, 2) Wall Mounted Remote
Wall Switch, 3) Remote Wall Thermostat, or 4) Wireless Remote Control.
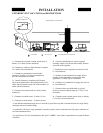
6. Connecting gas line — make gas line connections. All codes require a shut-off valve
mounted in the supply line. See Figure 15.
The flex line method is acceptable in the United States. However, Canadian requirements vary
depending upon locality. Installation must be in compliance with local codes.