


71
BUTTONHOLE AND BUTTON SEWING
KNOPFLÖCHER UND KNÖPFE NÄHEN
ОБМЕТЫВАНИЕ ПЕТЕЛЬ И ПРИШИВАНИЕ ПУГОВИЦ
For 1-Step BH Type
(Model STAR 240E, STAR 230E, PS-57, PS-55, STAR-50,
RSR-55, XRX-55)
When the buttonhole is not sewn correctly:
There are two different procedures for correcting buttonhole
sewing, depending on which part of the buttonhole is not sewn
correctly.
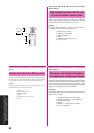
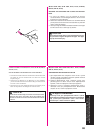
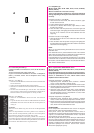
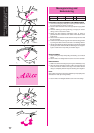
Correction Procedure 1 (See fig. A)
1. Raise the Presser Foot Lever, then remove the fabric, upper
thread and lower thread.
2. Pull the buttonhole lever slightly toward you.
3. Sew about 10 stitches with no fabric, upper thread, or lower
thread in the machine.
4. Place the fabric under the presser foot, and set the upper and
lower thread again, then lightly push the buttonhole lever toward
the back of the machine and sew the buttonhole from the
beginning.
Correction Procedure 2 (See fig. B)
1. Raise the Presser Foot Lever, then remove the fabric and all of
the sewn thread.
2. Place the fabric under the presser foot again, then lightly push
the buttonhole lever toward the back of the machine and sew the
buttonhole from the beginning.
NOTE:
When you are finished sewing all buttonholes be sure to raise the
buttonhole lever.
If the buttonhole lever is pushed toward the back of the machine
while sewing any stitch other than a buttonhole, the buttonhole feed
will be used and the stitch will not be sewn correctly.
If the buttonhole lever is accidentally pushed when you are sewing
a stitch other than a buttonhole, remove the fabric and thread from
the machine, raise the buttonhole lever, and sew about 20 stitches.
Then sew the intended stitch.
A
B
Для 1-ступенчатого обметывания петли
(Модели STAR 240E, STAR 230E, PS-57, PS-55, STAR-50,
RSR-55, XRX-55)
Если обметывание петель выполняется некачественно:
Существует два способа коррекции механизма обметывания
петель, в зависимости от того, какая планка петли
обрабатывается некачественно.
Операция коррекции 1 (См. рис. A)
1. Поднимите рычаг нажимной лапки, снимите с машины
ткань, а также верхнюю и нижнюю нитки.
2.
Слегка потяните рычаг лапки для обметывания петель на себя.
3. Прошейте примерно 10 стежков без заправленных в машину
ткани, верхней и нижней нитки.
4. Положите ткань под нажимную лапку, вновь заправьте
нижнюю и верхнюю нитки, а затем, нажав на рычаг лапки
для обметывания петель в направлении от себя, вновь
начните обметывание петли.
Операция коррекции 2 (См. рис. B)
1. Поднимите рычаг нажимной лапки, снимите с машины
ткань, а также всю прошитую верхнюю и нижнюю нитки.
2. Вновь положите ткань под нажимную лапку и затем, нажав
на рычаг лапки для обметывания петель в направлении от
себя, вновь начните обметывание петли.
ПРИМЕЧАНИЕ:
После завершения обметывания всех петель не забудьте
поднять рычаг лапки для обметывания петель.
Если рычаг лапки для обметывания петель нажат в
направлении от себя во время выполнения любых иных типов
строчки, за исключением обметывания петель, получение
качественной строчки невозможно.
Если Вы случайно нажали на рычаг лапки для обметывания
петель от себя во время выполнения любой иной строчки, за
исключением обметывания петель, снимите ткань и нитки с
машины, поднимите рычаг лапки для обметывания петель и
прошейте примерно 20 стежков. Затем вновь начните
выполнять требуемую строчку.
Für 1-Stufen-Knopfloch BH-Typ
(Modell STAR 240E, STAR 230E, PS-57, PS-55, STAR-50, RSR-55,
XRX-55)
Wenn das Knopfloch nicht richtig genäht wird:
Es gibt zwei verschiedene Methoden zur Korrektur von Knopfloch-
nähten, je nachdem, welcher Teil des Knopfloches nicht richtig
genäht wird.
Methode 1 (siehe Abb. A)
1. Heben Sie den Nähfußhebel an, entfernen Sie den Stoff, den Oberfaden
und den Unterfaden.
2. Ziehen Sie den Knopflochhebel leicht in Ihre Richtung.
3. Nähen Sie etwa 10 Stiche ohne Stoff, Oberfaden und Unterfaden in der
Maschine.
4. Den Stoff unter den Nähfuß legen, und den Ober- und Unterfaden
erneut einsetzen. Dann leicht den Knopflochhebel zur Rückseite der
Maschine drücken, und das Knopfloch von Anfang an nähen.
Methode 2 (siehe Abb. B)
1. Heben Sie den Nähfußhebel, nehmen Sie Stoff- und Fadenreste
heraus.
2. Legen Sie den Stoff wieder unter den Nähfuß, drücken Sie dann den
Nähfußhebel leicht nach hinten und nähen Sie das Knopfloch von
Anfang an.
NOTIZEN:
Wenn Sie mit dem Nähen fertig sind, müssen Sie den Knopflochhebel
anheben.
Wenn der Knopflochhebel nach hinten gedrückt wird, während ein
anderer Stich als der Knopflochstich genäht wird, wird der Knopfloch-
transport benutzt, und der Stich wird nicht richtig genäht.
Wenn der Knopflochhebel versehentlich gedrückt wird, während Sie
einen anderen Stich als ein Knopfloch nähen, entfernen Sie den Stoff und
Faden von der Maschine, heben Sie den Knopflochhebel an, und nähen Sie
etwa 20 Stiche. Dann nähen Sie den vorgesehenen Stich.