


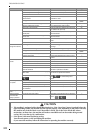


TROUBLESHOOTING
242
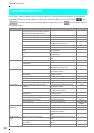
Needle breaks Needle is installed incorrectly. Reinstall the needle correctly. 39
Needle clamp screw is not tightened. Tighten the needle clamp screw. 40
Needle is turned or bent. Replace the needle. 39
Using improper needle or thread for the
selected fabric.
Check the “Fabric/Thread/Needle
Combination” chart.
41
Wrong presser foot was used. Use the recommended presser foot.
“STITCH SETTING
CHART”
Upper thread tension is too strong. Adjust the thread tension setting. 50, 174
Fabric is pulled during sewing. Do not pull the fabric during sewing. —
Spool cap is set incorrectly. Check the method for attaching the spool cap,
then reattach the spool cap.
29
There are scratches around the holes in the
needle plate.
Replace the needle plate, or consult your
authorized dealer.
65
There are scratches around the hole(s) in the
presser foot.
Replace the presser foot, or consult your
authorized dealer.
37
There are scratches on the race. Replace the race, or consult your authorized
dealer.
236
Needle is defective. Replace the needle. 39
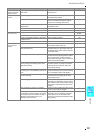
Fabric does not feed
through the machine
Feed dogs are set in the down position. Use the feed dog position lever to raise the
feed dogs.
85
Stitches are too close together. Lengthen the stitch length setting. 49
Wrong presser foot was used. Use the correct presser foot.
“STITCH SETTING
CHART”
Needle is turned, bent or the point is dull. Replace the needle. 39
Thread is entangled. Cut the entangled thread and remove it from
the race.
—
Machine does not
operate
There is no pattern selected. Select a pattern. 59, 116, 149, 199
“Start/Stop” button was not pushed. Press the “Start/Stop” button. 3
Main power switch is not turned on. Turn the main power to ON. 10
Presser foot is not lowered. Lower the presser foot. 3
“Start/Stop” button was pushed with the foot
controller attached.
Remove the foot controller, or use the foot
controller to operate the machine.
45
Speed control lever is set to control the zigzag
stitch width.
Use the foot controller instead of the “Start/
Stop” button to operate the machine.
45
All keys and buttons have been locked by
.
Press to unlock all keys and
buttons.
37, 39
Embroidery unit does
not operate
There is no pattern selected. Select a pattern. 149, 199
Main power switch is not turned on. Turn the main power to ON. 10
Embroidery unit is not attached correctly. Reattach the embroidery unit correctly. 146
Embroidery frame was attached before the unit
was initialized.
Perform the initialization process correctly. 146
LCD display is difficult
to see
LCD contrast is not properly adjusted. Adjust the LCD contrast. 19, 238
Nothing happens,
even if the LCD
display is pressed
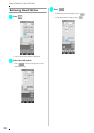
The screen has been locked. Press either of the following keys to unlock the
screen.
—
Problem Cause Solution Page
CAUTION
• This machine is equipped with a thread detection device. If the “Start/Stop” button is pushed before the
upper threading is done, the machine will not operate properly. Also, depending on the pattern selected,
the machine may feed the fabric even if the needle is raised. This is due to the needle bar release
mechanism. At these times, the machine will make a sound different from that made during normal
sewing. This is not the sign of a malfunction.
• If the power is disconnected during sewing:
Turn the main power to OFF and unplug the machine.
If you restart the machine, follow the instructions for operating the machine correctly.