


17
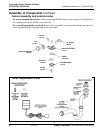
Express® Lavatory System SS-Series
Installation Instructions - For Service Only SS-2/IR/STD, SS-2/IR/JUV
Bradley Corporation • 215-1243 Rev. D; EN 03-813 5/11/04
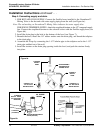
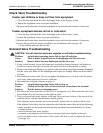
Check Valve Troubleshooting
If water just dribbles or does not flow from sprayhead:
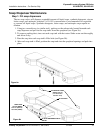
1. Close the stops and check the valves that supply water to the lavatory system.
2 Inspect the stop/check valves for proper installation.
3. Remove the flexible hoses from the stop/check valves and clean the strainers, if necessary.
If water sprayhead delivers all hot or cold water:
1. Close the stops and check the valves that supply water to the lavatory system.
2. Inspect the stop/check valves for proper installation.
3. Remove the flexible hoses from the stop/check valves and clean the strainers, if necessary.
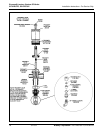
4. Inspect mixing valve for proper installation (see Vernatherm valve on page 19).
• A red marking indicates the hot inlet.
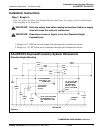
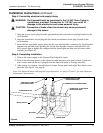
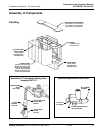
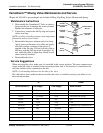
Solenoid Valve Troubleshooting
CAUTION: Turn off electrical and water supplies to unit before troubleshooting.
Problem: An individual operating station fails to shut off and drips.
Cause: There is debris trapped between the diaphragm and the valve seat.
Solution: Remove debris between diaphragm and the valve seat.
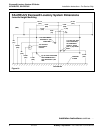
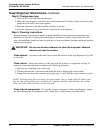
1. Using a small wrench, loosen the bonnet nut, unscrewing counterclockwise, and gently tip
forward to remove from the valve body. Be careful not to lose the armature or spring.
2. Remove the diaphragm. Remove any particles that have been trapped between the diaphragm
and the valve seat. Rinse off the diaphragm and inspect for damage. Make sure both orifices
are open.
3. Reassemble in reverse order. Do not overtighten the bonnet nut or you may crack the plastic
valve body. Hand tight plus 1/8 turn is sufficient.
4. Reconnect the wiring per diagram on page 14.
Problem: An individual operating station fails to turn on.
Cause: A failed coil for the valve, or loose electrical connection to the terminal.
Solution: Test the station to determine cause.
1. Disconnect the wires from the coil (269-579) of an adjacent valve. Disconnect the wires from
the problem valve and reconnect to the adjacent valve.
2. Turn on electrical and water supplies to the unit. Pass your hand in front of the sensor of the
problem station, and the adjacent station should operate.
If the adjacent station operates and cycles normally, replace the coil on the problem valve.
If the adjacent valve fails to turn on, inspect the wires from the sensor cable and do the following:
• make sure there are no breaks and that the fully insulated disconnect terminals are firmly
crimped in place;
• turn off electrical and water supplies;
• reconnect to the adjacent valve and turn on electrical and water supplies to the unit;
• pass your hand in front of the sensor. If the station still fails to turn on, replace the sensor
(see page 16).