


EN
|
42
Bosch Security Systems | 20 January 2004
DVAS | Instruction Manual | Appendix A
Appendix A
Servicing Removable Components
Power Supply Unit (PSU)
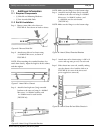
Insertion
Pull the handle of the PSU so it is at 90° to the main
PSU unit. Line up the PSU with the guide rails on the
DVAS. Insert the PSU gently until it comes to a halt,
then close the handle and secure it in place with the
screw (included).
Removal
Turn off the power switch. Disconnect the power cord,
loosening the cable clamp if necessary. Loosen the
screw on the power supply by turning it counter-
clockwise. Pull out the handle of the PSU so that is 90°
to the chassis. While supporting the weight of the PSU,
use the handle to pull the power supply free from the
chassis.
If your DVAS has the dual redundant power supply
option, a faulty power supply may be removed and
replaced while the unit is operational. Only remove a
power supply from a working unit if it is faulty and a
replacement is on-site. Removing a PSU when no
replacement is immediately available may result in
overheating and shutdown. Ensure that the correct
PSU is removed; the faulty power supply will not have
a green status LED illuminated on its rear panel.
RAID Controller
Insertion
A RAID controller should not be inserted while the
unit is powered on. If exchanging a faulty RAID
controller, schedule a shutdown before replacing it.
Insert the RAID controller into its slot, ensuring that
the metal runners line up with the internal guides.
Firmly push the RAID controller fully into the chassis
until the side clips click into place.
Removal
Do not remove a faulty controller while power is on;
power must be disconnected.
Push the side clips securing the controller inwards
(toward each other). While supporting the weight of
the unit, use the handles to pull the controller free
from the unit.
Hard Drive Assemblies
Disk drives are sensitive to static electricity and
physical shock. Observe proper ESD
precautions and handle with care.
Insertion
Line the disk carrier up to an available disk slot. Be
sure the handle is open, and the carrier push button is
toward the bottom of the chassis. Push the disk carrier
in until it is fully inserted. Close the handle and push
in the carrier button to secure it in place.
Removal
Removing a disk while in operation within a RAID set
will cause the RAID set to degrade. Only remove a
disk which has been marked as bad by the GUI, with
an Amber LED illuminated beneath it. To remove a
disk, push the button on the disk carrier to release the
handle. Gently pull the bottom of the handle toward
you and wait ten seconds for the disk to stop spinning.
Continue sliding the disk out of the chassis.