


EN
|
14
Bosch Security Systems | 20 January 2004
DVAS | Instruction Manual | Before You Begin
6BEFORE YOU BEGIN
Ensure the following:
• Installation environment is less than 40°C.
• The front drive bays and rear ventilation panels
are not obstructed.
•Main Power is sufficient to handle the load of
the system.
• Rack is properly grounded.
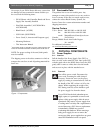
Tips for Rack-mounting:
•Remove the power supplies and hard disk
canisters to make the system lighter.
•Request assistance to lift the unit into the rack.
•Do not to trap fingers or items of clothing.
• Ensure all fixtures are secure and bolts and
screws are fully tightened.
6.1 Basic Installation Steps
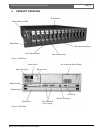
1. Attach the SCSI cable from the DVR to the
DVAS.
If only one DVR is connected to the DVAS, ensure
that the cable is connected to Channel 0. Refer to
SECTION 4.0, PRODUCT OVERVIEW.
2. Attach the power cord(s) to the disk array and
apply power to the unit.
If an audible alarm is heard, the DVAS unit does not
have a RAID group configured, or no disks are
present.
3. Wait one minute and apply power to the DVR
unit.
4. Configure the DVR for archiving (see DVR
instruction manual).
5. Depending upon the model purchased, the
DVAS unit is preconfigured.
For your convenience, DVAS disk arrays are shipped
with drives preconfigured for RAID.
These configurations suit most applications, but if not,
or to use additional features, you must set up the
network connection and access the GUI. See
SECTION 6.2, Setting up the Network Connection.
Use the GUI interface to:
•Add a Hot Spare.
•Add Drive(s) (if storage is expanded, the entire
RAID must be reconstructed).
• Change the allocation of storage (only applicable
if two DVRs are connected to a single DVAS).
•Monitor the DVAS system.
•Use the e-mail alert feature (warnings and error
messages can be e-mailed to a specified address).
•Attach two DVRs to a DVAS0416 or a
DVAS0816 unit (see Quick Configuration page).
•Attach only one DVR to a DVAS1416 (see Quick
Configuration page).
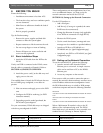
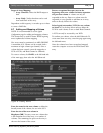
6.2 Setting up the Network Connection
To use the web-based GUI, perform the following:
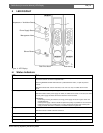
1. Attach a network cable from the DVAS’s
Ethernet port to a network. A simple crossover
cable can be used from a PC to the DVAS’s
Ethernet port.
2. Access any computer on the network.
If no crossover cable was used to connect the unit to a
network, the network’s subnet mask may not allow access
to this IP address without some reconfiguration. Access
the DVAS Series disk array via a shell or DOS prompt
on the host computer and enter the following command.
Windows
®
:
route add 10.11.12.13 mask 255.255.255.255 <workstation IP number>
Linux:
/sbin/route add 10.11.12.13/32 gw <workstation IP number>
Solaris:
route add 10.11.12.13 mask 255.255.255.255 <workstation IP number>
Where <Workstation IP number> refers to the IP
address of the workstation being used. The DVAS
Series disk array’s web interface is now accessible via a
standard browser (Netscape or Internet Explorer).
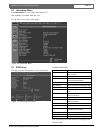
Model Number of DVRs Connected Allocation of Storage
4 Hard Drive Model 1 DVR (Channel 0) 100% to Host Port 0
8 Hard Drive Model 1 DVR (Channel 0) 100% to Host Port 0
14 Hard Drive Model 2 DVRs (Channel 0 + Channel 1) 50% to Host Port 0; 50% to Host Port 1