


16
w ww.b is se ll .c om 8 00 .2 37 .7 69 1
5
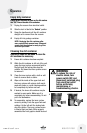
The only tool you’ll need to assemble your
vacuum cleaner is a Phillips screwdriver.
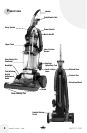
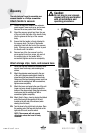
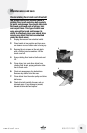
Attach handle to vacuum
1. Locate the bag that contains the extension
wand support, lower cord wrap, and screws.
Remove the screw packet from the bag.
2. Stand the vacuum upright and from the rear
of the unit, slide the base of the handle firmly
into the grooves at the top of the vacuum
body.
3. Ensure that the handle is firmly attached to
the vacuum body. The front of the handle
should be flush with the front of the vacuum
body. If there are any gaps, continue to push
the handle until it is secure.
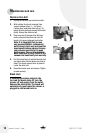
4. Remove two of the four screws from the
screw packet. Insert one screw, into each of
the existing holes in the handle. With a
screwdriver, tighten each screw completely.
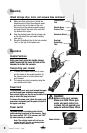
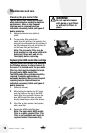
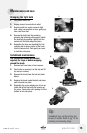
1. Locate the bag that contains the extension wand
support, lower cord wrap, and remaining two
screws.
2. Attach the extension wand support to the rear
of the unit. Extension wand support should be
placed about half way down the vacuum body.
Using one of the two remaining screws, insert one
screw into the existing hole. With a screwdriver,
tighten screw completely.
3. Attach the lower cord wrap to the rear of the unit.
Lower cord wrap should be placed toward the
bottom of the vacuum body. Using the last screw,
insert screw into the existing hole. With a
screwdriver, tighten completely.
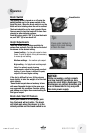
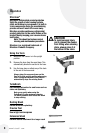
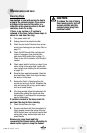
4a. Attach Twist ‘n Snap
™
hose by placing the tabbed
end of the hose into the opening of the unit,
located on the left side of the vacuum (when
viewing from the back.)
4b. Turn the hose to the right to lock into place. Place
the working end of the hose into the hole on the
right side of the unit, near the wheel.
NOTE: The vacuum will not operate
effectively unless the hose is firmly
attached.
Assembly
2
4
Caution:
Do not plug in your vacuum
cleaner until you are familiar
with all instructions and
operating procedures.
Attach storage clips, tools, and vacuum hose
2
3
4a 4b