


11
• Rag - Cotton (Not Synthetic)
• Primer and Cleaner
• Solvent Cement - PVC for PVC Components and CPVC for CPVC
Components
• Containers - Metal or Glass to hold Primer and Cement. Select the
type of PVC or CPVC materials to be used on the basis of their
application with respect to chemical resistance, pressure rating,
temperature characteristics,etc.
• Insertion Tool - Helpful for larger diameter pipe and fittings
(6" and above).
PRIMER
It is recommended that Tetrahydrofuran (THF) be used to prepare the
surfaces of pipe and fittings for solvent welding. Do not use water,
rags, gasoline or any other substitutes for cleaning PVC or CPVC
Surfaces. A chemical cleaner such as MEK may be used.
CEMENT
The cement should be a bodied cement of approximately 500 to 1600
centipoise viscosity containing 10-20% (by weight) virgin PVC material
solvated with tetrahydrofuran (THF). Small quantities of dimethyl
formamide (DMF) may be included to act as a retarding agent to extend
curing time. Select the proper cement; Schedule 40 cement should be
used for Schedule 40 pipe. Never use all-purpose cements, commercial
glues and adhesives or ABS cement to join PVC or CPVC pipe and
fittings.
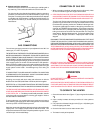
SAFETY PRECAUTION: PRIMERS AND CEMENTS ARE EXTREMELY
FLAMMABLE, AND MUST NOT BE STORED OR USED NEAR HEAT OR
OPEN FLAME. ALSO, USE ONLY IN A WELL-VENTILATED AREA.
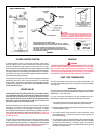
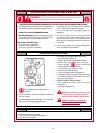
3. MAKING THE JOINT
A. Cutting
Pipe must be squarely cut to allow for the proper interfacing of the
pipe end and the fitting socket bottom. This can be accomplished
with a miter box saw or wheel type cutter. Wheel type cutters are
not generally recommended for larger diameters since they tend to
flare the corner of the pipe end. If this type of cutter is used, the flare
on the end must be completely removed.
NOTE: Power saws should be specifically designed to cut
plastic pipe.
STEP A
B. Deburring
Use a knife, plastic pipe deburring tool, or file to remove burrs from
the end of small diameter pipe. Be sure to remove all burrs from around
the inside as well as the outside of the pipe. A slight chamfer (bevel)
of about 10°-15° should be added to the end to permit easier insertion
of the pipe into the end of the fitting. Failure to chamfer the edge of
the pipe may remove cement from the fitting socket, causing the joint
to leak.
STEP B
C. Test dry fit of the joint
Tapered fitting sockets are designed so that an interference fit should
occur when the pipe is inserted about 1/3 to 2/3 of the way into the
socket. Occasionally, when pipe fitting dimensions are at the tolerance
extremes, it will be possible to fully insert dry pipe to the bottom of
the fitting socket. When this happens, a sufficient quantity of cement
must be applied to the joint to fill the gap between the pipe and fitting.
The gap must be filled to obtain a strong, leak-free joint.
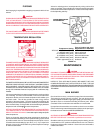
D. Inspection, cleaning, priming
Visually inspect the inside of the pipe and fitting sockets and remove
all dirt, grease or moisture with a clean dry rag. If wiping fails to
clean the surfaces, a chemical cleaner must be used. Check for
possible damage such as splits or cracks and replace if necessary.
Depth-of-entry mark
Marking the depth of entry is a way to check if the pipe has reached
the bottom of the fitting socket in step F. Measure the fitting depth
and mark this distance on the pipe O.D. You may want to add several
inches to the distance and make a second mark as the primer and
cement will most likely destroy your first one.
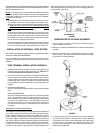
Apply primer to the surface of the pipe and fitting socket with a natural
bristle brush (see chart). This process softens and prepares the
PVC or CPVC for the solvent cementing step. Move quickly and without
hesitation to the cementing procedure while the surfaces are still
wet with primer.
E. Application of solvent cement
• Apply the solvent cement evenly and quickly around the outside
of the pipe at a width a little greater than the depth of the fitting
socket.
• Apply a light coat of cement evenly around the inside of the fitting
socket. Avoid puddling.
• Apply a second coat of cement to the pipe end.
STEP E
NOTE: Cans of cement and primer should be closed at all times when
not in use to prevent evaporation of chemicals and hardening of cement.
They are also very flammable and should be kept away from heat or
flame.
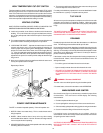
F. Joint assembly
Working quickly, insert the pipe into the fitting socket bottom and give
the pipe or fitting a 1/4" turn to evenly distribute the cement. Do not
continue to rotate the pipe after it has hit the bottom of the fitting
socket. A good joint will have sufficient cement to make a bead all
the way around the outside of the fitting hub. The fitting will have a
tendency to slide back while the cement is still wet so hold the joint
together for about 15 seconds.
STEP F