


Installation Instructions
Continued
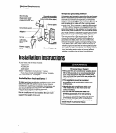
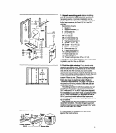
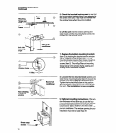
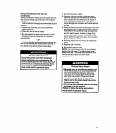
Room side
-16”-
Flush with
window
Use screws 6 or 6A
Predrill Yr4” holes
if tracks are metal
6
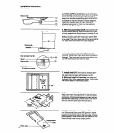
4. Attach support bracket (Item 2) loosely to
the underside of shelf with either short or long leg
down and with end of bracket either toward or
away from window, depending upon construction
and depth of wall and window sill (see diagram).
Attach sill bracket (Item 3). Each bracket is
attached using one
%6”
bolt, nut and washers
(Items 4,4A, 48 and 4C).
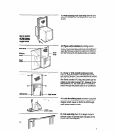
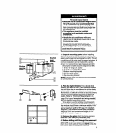
5. With the assembled shelf and brackets still
in the window opening, adjust brackets until shelf
is firmly seated and sloping down to outside. If you
use a level, be sure you have % bubble of slope.
Without a level, place the translucent panel (Item
5) on shelf. The top of long side of the panel will be
%6”
back from the window line (see diagram).
6. If slope back is correct, tighten all nuts
securely. Install lower track seal (Item 9) shown in
diagram. This track seal has two holes which line
up with matching screw holes in shelf.
7. Install shelf 2%” from side of window open-
ing, securing it in place with screws 6 or 6A.
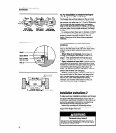
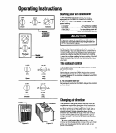
6. Measure height of opening (see diagram).
Subtract
20%6”
from measured height. This will be
the actual height of translucent panel.
9. Measure out the distance determined in
Step 8 and mark it along the 20%” side of translu-
cent panel. Clamp panel between a board and an
appropriate supporting surface close to the mark
and cut with fine tooth saw. Remove burrs.
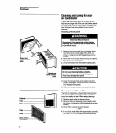
10. Lift vertically removing panel frame from
unit. Slide translucent panel into groove in frame,
keeping honeycomb side to the face side of frame
(see diagram). Slide frame back into place on unit.
Panel should enter the top angle groove.