


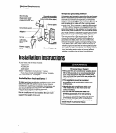


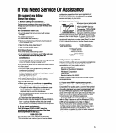

Knurled
I I
knob
Wlndow
opening
frame -
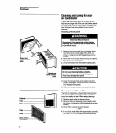
Personal Injury Hazard
l
Because this air conditioner weighs about
70 to 75 pounds, it is recommended that
you have someone help you tnstall your
new unit and that you both use proper lift-
ing techniques.
l
This appliance must be installed
according to all applicable codes and
ordinances.
l
Handle the air conditioner with care.
Watch out for the sharp metal fins on the
front and rear coils.
l
Do not use the collected water for
drinking purposes. It is not sanitary.
Failure to follow the above precautions
could result in personal injury.
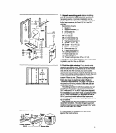
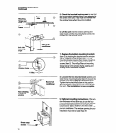
1. Unpack mounting parts before installing
your air conditioner. Be sure you have all the nec-
essary parts (see top two diagrams at left). This air
conditioner will fit most steel casement windows. A
normal installation can be made with a screw-
driver,
%6”
socket driver, tape measure and drill.
Description of parts (top hvo diagrams at left)
1 #lO x W long s.m. screw
2 # 1 O-32 x 3/s” long math. screw
3 Bottom mounting bracket
4 Knurled knob screw
5 Top mounting bracket
NOTE: Above parts (not shipped loose) installed
on unit by factory.
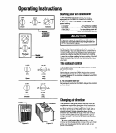
2. Pick the right window. First, decide what
room(s) you want to cool. Then choose a window
that will allow the air-conditioned air to flow freely
and directly into the room(s) you want cooled.
Remember, it’s difficult to move air around corners.
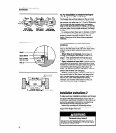
Choose a window that’s also near an electrical
outlet. (Refer to “Electrical Bequirements” on
page 3 for type of receptacle and wiring needed.)
Do not use an extension cord.
To be able to use the window mounting parts
shown in the diagram to the left of Step 1 above,
the window should have a minimum width of 14%”
and a maximum width of 16” (see “A” in bottom
diagram). The window should have a minimum
height of 10%” and a maximum height of 11%”
(see “B” in bottom diagram).
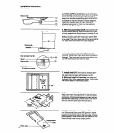
3. Remove the glass from the frame opening
selected. Clear away any hardened putty.
4. Before sliding unit through the casement
opening, remove the bottom window bracket
(Item 3) on both sides of the unit. NOTE: Only the
top screws (Item 1) need to be removed.
9