


5
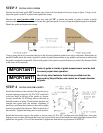
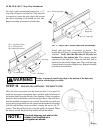
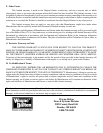
STEP 3 INSTALLING GUIDES
Position the left hand guide 3/8” from the edge of the left hand jamb and loosely clamp in place. Using a level,
adjust the guide so that it is plumb and tighten the clamp.
Measure the exact curtain width of the door and add 7/8” to obtain the inside of guide to inside of guide
measurement. Use this measurement to locate the right hand guide. Loosely clamp the right hand guide to the jamb.
Plumb the guide and tighten the clamp.
Using a string and level, ensure that the tips of the left and right hand guides are level to each other. Shim guides as
needed. Double check the inside of guide to inside of guide measurement at top, middle, and bottom to ensure that
the guides are plumb and parallel. Fasten both guides to the jambs using the fasteners provided (See Fastener Table
in the front of this manual).
Inside of guide to inside of guide measurement must be held
to ensure proper door operation.
Use of any other fasteners than those provided must be
approved by Wayne-Dalton and cannot be of lesser diameter
or grade.
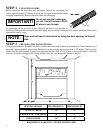
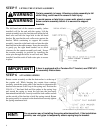
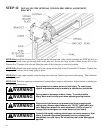
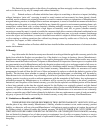
STEP 4 INSTALLING BRACKETS
Install the brackets to the outside of the guides (away
from the opening) using two 1/4-20 x 9/16” track bolts
in the two holes at the top of the guides, as shown.
Loosely install the 1/4-20 flange nuts on the bolts to
hold the brackets in place. Check that the brackets are
straight and square with one another, shimming if
necessary, and fasten the brackets to the wall using the
fasteners provided (See Fastener Table in the front of
this manual). Tighten the flange nuts on each bracket.
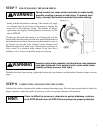
Install the bottom bar stops to the guides as shown using 1/4-20 x 5/8” carriage bolts and flange nuts. Leave the
fasteners loose to allow the bottom bar stops to pivot out of the way of the bottom bar angle when the curtain will be
pulled into the guides. You will be instructed to tighten the bottom bar stop fasteners in STEP #7.
IMPORTANT!
IMPORTANT!