


10
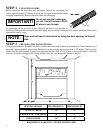
STEP 12 INSTALLING THE OPTIONAL TENSION-PRO SPRING ADJUSTMENT
BRACKET
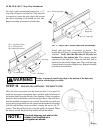
STEP #12a: Install the Tension-Pro™ bracket on the left hand side of the curtain assembly per STEP #4 & #5 in
this manual. Insert cotter pin through hole in the axle end. Do not use large washer (shown in step #5) on the
Tension-Pro™ bracket side axle end. Bend the ends of the cotter pin to secure in position.
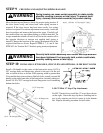
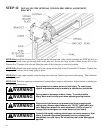
STEP #12b: Stretch and attach spring end to the spring holder plate of the Tension-Pro™ bracket. Tighten the
flange nylon lock hex nut to keep spring in place.
STEP #12c: Using a pipe wrench, rotate the large nut clockwise 2 turns to pre-tension the spring. Then, lubricate
and adjust guides.
STEP #12d: Test door operation to determine if spring balance requires adjustment. Adjust tension as needed per
the following instructions.
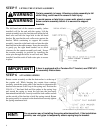
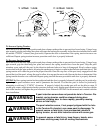
Spring tension can cause severe or fatal injury. To avoid injury,
repairs/ adjustments must be made by a trained door technician.
Spring tension increases as door closes. To avoid possible
Injury, door must be fully open when adjusting spring tension
.
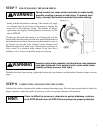
Pipe wrench interference can prevent pawl from engaging with
ratchet gear. Always adjust tension one “CLICK” (gear tooth) at a
time. Reposition wrench for each adjustment. Failure of pawl to
engage with ratchet gear can cause severe or fatal injury.
Contact with rapidly rotating ratchet gear can cause severe or fatal
injury. If wrench slips when decreasing tension, release pawl
immediately to avoid injury. Do not secure pawl in the disengaged
position.
WARNING
WARNING
WARNING
WARNING