


© SprayTECH Corporation. All rights reserved. 11
English
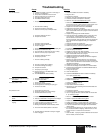
Troubleshooting
Problem
The unit will not run
The unit will not prime.
The unit will not build or maintain
pressure.
Fluid leaks from the upper end of the
fluid section.
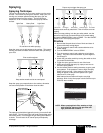
The spray pattern is bad.
The pressure is low.
The fuse at the pump circuit breaker is
blown.
Low performance/circuit breaker
tripping.
Cause
1. A breaker is tripped on the unit or at the plug in.
2. The unit is not plugged in.
3. The pressure control knob is set too low.
4. There is faulty wiring or a faulty circuit.
5. The motor brushes are worn.
6. The ON/OFF switch is faulty.
1. The piston packings are dried out.
2. The inlet valve is leaking.
3. The pump inlet screen is plugged.
4. There is air in the pump or the paint hose.
5. The piston packings are worn.
6. The paint is too thick.
7. The siphon tube is clogged.
8. The siphon tube has an air leak.
9. The tip is clogged.
1. The pressure adjustment knob is not properly set.
2. The pump inlet strainer is dirty.
3. The valve balls or valve seals are worn or dirty.
4. There is air in the pump or paint hose.
5. The piston packings are worn.
6. The spray tip is worn.
7. The unit is leaking internally.
8. The inlet or outlet valve is leaking.
9. The external fittings are leaking.
10. The paint is too thick.
11. The spray tip is too large.
12. Paint has built up on the slide block in the
extension housing.
13. The PRIME/SPRAY valve is leaking.
1. The upper packing is worn.
2. The piston rod is worn.
1. The tip is too large.
2. The pressure is set incorrectly.
3. Not enough fluid is reaching the spray gun.
4. The fluid is too thick.
1. The pressure is set too low.
2. The power supply is the wrong voltage.
3. The extension cord is too long.
1. Pressure build up at the pump is too great.
2. There is a malfunction in the gear box or linkages.
1. Loose motor shunt wires or worn brushes.
2. Loose connections in pressure control box.
3. Safety shutoff pressure incorrect.
4. Missing circuit breaker switch boot/dirty switch.
5. The current limit switch position is incorrect.
6. The slide block or extension housing is clogged.
7. Filter is clogged.
Solution
1. Check the breakers and reset if necessary.
2. Plug the unit in.
3. Increase the pressure.
4. Take the unit to an Authorized Service Center.
5. Check the brushes and replace if necessary
6. Take the unit to an Authorized Service Center.
1. Remove the suction tube and feel the lower check ball to
be sure that it is free. Place a full cup of paint thinner over
the end of the fluid section and turn on the pump.
2. Replace the inlet valve with the kit P/N 0294689.
3. Remove the inlet screen and clean.
4. Hold the gun trigger in the open position and run the unit for
about 10 seconds until the air is purged. Check the suction
tube for leaks.
5. Replace the packings with kit P/N 0279910.
6. Prime the pump with compatible solvent. Bring the pump
up to pressure. Carefully remove the pump from the
solvent container and immerse the inlet tube in the thick
fluid to be sprayed. With the spray tip removed, trigger the
gun until the thick fluid appears at the gun. Replace the
spray tip.
7. Remove and clean the suction tube.
8. Check the suction tube and seal any leaks found.
9. Relieve the pressure; remove and clean the tip.
1. Increase the pressure.
2. Clean the pump inlet strainer.
3. Replace or clean the valve balls and seats.
4. Hold the gun trigger in the open position and run the unit for
about 10 seconds until the air is purged.
5. Replace the packings with kit P/N 0279910.
6. Replace the spray tip by following the directions supplied
with your spray gun.
7. With the gun trigger closed, allow the unit to come up to
pressure and then shut it off when the pump momentarily
starts. Look to see where the internal leak is occurring and
rebuild the fluid section.
8. Replace the valves by using kit P/N 0294689.
9. Check all hose fittings and connections for external leaks.
10. Check the fluid manufacturer's recommendations listed on
the fluid container label.
11. Change the spray tip.
12. Clean the slide block.
13. Check the PRIME/SPRAY valve and clean if necessary.
Put in spray position firmly.
1. Relieve the pressure and replace the packings.
2. Replace the piston rod.
1. Change to a smaller spray tip.
2. Reset the pressure.
3. Clean all the strainers and filters.
4. Add solvent or water according to the fluid manufacturer's
recommendations.
1. Increase the pressure.
2. Connect the unit to a 120 volt AC connection.
3. Use a 12 gauge extension cord that does not exceed 100
ft. (31 meters) in length.
1. Take the unit to a factory Authorized Service Center.
2. Repair or replace the malfunctioning parts.
1. Replace brushes and wires as necessary.
2. Tighten connections or scrape residue off of connectors.
3. Recalibrate the safety shutoff pressure to 2650 +100/-0 psi.
4. If the circuit breaker switch is clogged with contaminates,
replace switch.
5. The unit should be placed in the 15 amp mode only when
the wall circuit breaker is tripping. When the unit is in the
15 amp mode, it is normal for it to slow down.
6. Clean.
7. Clean the filter. If spraying heavier materials such as block
filler or mastics, remove the filter.