


TECHNICAL SUPPORT 1 800 908 0884
14 18
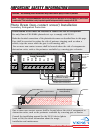
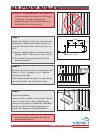
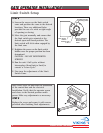
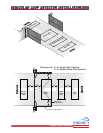
STEP 8
A. Loosen the screws on the limit switch
cams and position the cams to the desired
locations. There are additional holes
provided in case of a wide or tight angle
of opening or closing.
B. Move the gate manually and ensure that
the limit switch gets actuated at the
desired open and closed position. The
limit switch will click when engaged by
the limit cam.
C. Retighten the screws on the limit switch
holders once the proper position has been
determined.
CAUTION – DO NOT OVERTIGHTEN
SCREWS!
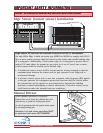
D. Run the unit 2 full cycles without
interruption (from limit to limit) to
execute a “Learn Cycle.”
E. Fine-tune the adjustment of the Limit
Switch Cams.
Position Cam
to Suit
Tighten Clamping
Screw Securely
Before Adjusting
Cams
Limit Switch
Holder
Additional Cam
Mounting Holes
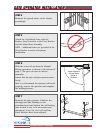
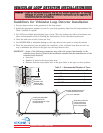
Note: Leave cover off until after the installation
of the control box and the electrical
installation. Verify that the operator opens
and closes to the desired position under
power. Make any adjustments as necessary.
STEP 9
Replace the cover and secure it with screws
provided after finishing final adjustments.
Limit Switch Setup
GATE OPERATOR INSTALLATIONGATE OPERATOR INSTALLATION