PKG-SVX17A-EN 9
Installation procedures should be per-
formed in the sequence that they
appear in this manual. Do not destroy
or remove the manual from the unit.
The manual should remain weather-
protected with the unit until all instal
-
lation procedures are complete.
Note: It is not the intention of this
manual to cover all possible varia
-
tions in systems that may occur or to
provide comprehensive information
concerning every possible contin
-
gency that may be encountered dur-
ing an installation. If additional
information is required or if specific
problems arise that are not fully dis
-
cussed in this manual, contact your
local Sales office.
Note: “Warnings” and “Cautions”
appear at appropriate
places in this manual. Your personal
safety and the proper
operation of this machine require that
you follow them carefully. The Com-
pany assumes no liability for installa-
tions or servicing performed by
unqualified personnel.
Installation Checklist
An “Installation Checklist” is provided
at the end of the installation section of
this manual. Use the checklist to verify
that all necessary installation proce
-
dures have been completed. Do not
use the checklist as a substitute for
reading the information contained in
the manual. Read the entire manual
before beginning installation proce
-
dures.
Unit Inspection
Inspect material carefully for any ship-
ping damage. If damaged, it must be
reported to, and claims made against
the transportation company. Compare
the information that
appears on the unit nameplate with
ordering and submittal
data to insure the proper unit was
shipped. Available power supply must
be compatible with electrical charac-
teristics specified on component
nameplates. Replace damaged parts
with authorized parts only.
Inspection Checklist
To protect against loss due to damage
incurred in transit, complete the fol-
lowing checklist upon receipt of the
unit.
[ ] Inspect individual pieces of the
shipment before accepting the unit.
Check for obvious damage to the
unit or packing material.
[ ] Inspect the unit for concealed dam-
age before it is stored and as soon
as possible after delivery. Con
-
cealed damage must be reported
within 15 days. If concealed dam-
age is discovered, stop unpacking
the shipment. Do not remove dam-
aged material from the receiving
location. Take photos of the dam
-
age if possible. The owner must
provide reasonable evidence that
the damage did not occur after
delivery.
[ ] Notify the carrier’s terminal of dam-
age immediately by phone and by
mail. Request an immediate joint
inspection of the damage by the
carrier and the consignee.
[ ] Notify the sales representative and
arrange for repair. Do not repair the
unit until the damage is inspected
by the carrier’s representative.
Initial Leak Test
All CTA units are shipped with a hold-
ing charge of nitrogen in each circuit.
Remove the service access panel(s)
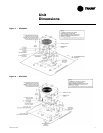
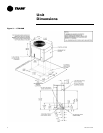
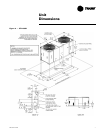
shown in Figures 1 to 4. Locate the
discharge or liquid line gauge ports
for each circuit. Install gauges to
determine if the circuits are still pres-
surized. If not, the charge has
escaped. Repair as required to obtain
a leak-free circuit.
Lifting Recommendations
Before preparing the unit for lifting,
estimate the approximate center of
gravity for lifting safety. Because of
placement of internal components,
the unit weight may be unevenly dis
-
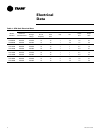
tributed. Approximate unit weights
are given in Table 2.
Model
Ship
Max.
Net
Max.
Corner Weights
#1 #2 #3 #4
CTA090A 254 210 59 63 39 49
CTA120A
325 281 62 85 57 77
CTA120B
CTA180B 532 447 100 105 124 118
Table 2: Unit and corner weights (lbs)
WARNING
Heavy Objects!
Do not use cables (chains or
slings) except as shown. Each of
the cables (chains or slings) used
to lift the unit must be capable of
supporting the entire weight of
the unit. Lifting cables (chains or
slings) may not be of the same
length. Adjust as necessary for
even unit lift. Other lifting
arrangements may cause equip
-
ment or property-only damage.
Failure to properly lift unit could
result in death or serious injury.
See details below.
The crated unit can be moved using a
forklift of suitable capacity. For lifting
the unit, attach lifting straps or slings
securely to the lifting holes at each
corner. Use spreader bars to protect
the unit casing from damage. Test lift
the unit to determine proper balance
and stability.
CAUTION
Equipment Damage!
Use spreader bars to prevent lift-
ing straps from damaging the
unit. Install bars between lifting
straps. Failure to properly lift unit
may result in crushing unit cabi
-
net or damaging unit finish.
Installation


