


Routine Maintenance
CAH-SVX01A-EN 49
Air Filters
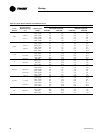
Refer to product catalog
CLCH-PRC003-EN for filter sizes,
types, and quantities.
ƽ WARNING
Hazardous Voltage with
Capacitors!
Disconnect all electric power,
including remote disconnects and
discharge all motor start/run
capacitors before servicing. Follow
proper lockout/tagout procedures to
ensure the power cannot be
inadvertently energized. For variable
frequency drives or other energy
storing components provided by
Trane or others, refer to the
appropriate manufacturer’s
literature for allowable waiting
periods for discharge of capacitors.
Verify with an appropriate voltmeter
that all capacitors have discharged.
Failure to disconnect power and
discharge capacitors before
servicing could result in death or
serious injury.
Note: For additional information
regarding the safe discharge of
capacitors, see PROD-SVB06A-EN.
Throwaway Filters
To replace throwaway filters, install
new filters with the directional
arrows pointing in the direction of
airflow.
Note: Bag and cartridge filters must
have an airtight seal to prevent air
bypass. If using other than Trane-
supplied filters, apply foam
gasketing to the vertical edges of the
filter.
Permanent Filters
To clean permanent filters:
1 Disconnect all electrical power to
the unit.
2 Wash the filter under a stream of
water to remove dirt and lint.
3 Remove oil from the filter with a
wash of mild alkali solution.
4 Rinse the filter in clean, hot water
and allow to dry.
5 Coat both sides of the filter by
immersing or spraying it with Air
Maze Filter Lote W or an
equivalent.
6 Allow to drain and dry for about
12 hours.
7 Reinstall the filter.
Note: It may be preferable to keep
extra, clean filters to replace the
dirty filters to minimize unit
downtime for filter maintenance.
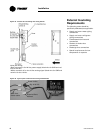
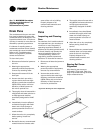
Front Load Filters
Most filters in custom units are
installed in unitary sheet metal
frames. Filters are secured with a
metal clip. There are several
different styles.
To install filters:
1 Disconnect power to the unit.
2 Open or remove the filter clip.
3 Remove the filter from the rack.
4 Install new filters with the
directional arrows pointing in the
direction of airflow.
5 Secure the filter using the
appropriate clip for each filter.
The filters are often installed in a
pre/post filter configuration. Be sure
to note the order of installation.
Note: Filters must have an airtight
seal to prevent air bypass.
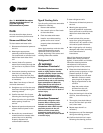
Side Load Filters
Most filters in custom units are
installed in unitary sheet metal
frames. If unit is provided with side
access rack, do the following for
installation:
2-inch or 4-inch flat filters
1 Disconnect the power to the unit.
2 Open the filter section access
door and remove the filters and
block-offs from their installed
position.
3 Slide the filter into the rack.
4 Some side load racks will be
provided with block-off plates.
Install them into the rack last
before closing the door.
5 Close and secure the door,
making certain the door closes
snug against the block-off.
Bag or Cartridge Filters
1 Disconnect power to the unit.
2 Keeping the bag filters folded,
slide each filter into the filter
rack, pushing them tightly
against the unit. Pleats should be
in the vertical position.
3 If using optional pre-filters, slide
them into the appropriate filter
rack.
4 If block-offs are provided with the
unit, slide the block-offs into the
filter track.
5 Close and secure the access
door, making certain the door
closes snug against the rack.
Note: The block-off is intended to
make a seal when the access door is
closed. It may require a few
adjustments to ensure a proper seal.