


– 44 –
FILE NO. SVM-03008
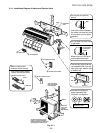
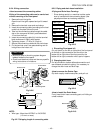
<When the installation plate is directly mounted on
the wall>
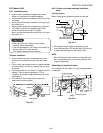
1. Securely fit the installation plate onto the wall by
screwing it in the upper and lower parts to hook up
the indoor unit.
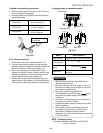
2. To mount the installation plate on a concrete wall
with anchor bolts, utilize the anchor bolt holes as
illustrated in the above figure.
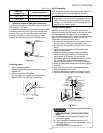
3. Install the installation plate horizontally in the wall.
CAUTION
When installing the installation plate with a
mounting screw, do not use the anchor bolt hole.
Otherwise the unit may fall down and result in
personal injury and property damage.
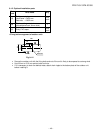
Fig. 9-2-4
Fig. 9-2-5
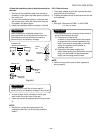
Projection
15 mm or less
Clip anchor
(local parts)
5 mm dia. hole
Anchor
bolt
77
77
7 Mounting
screw
∅4 x 25
ss
ss
s
CAUTION
Failure to firmly install the unit may result in
personal injury and property damage if the unit falls.
• In case of block, brick, concrete or similar type
walls, make 5 mm dia. holes in the wall.
• Insert clip anchors for appropriate mounting screws
7.
NOTE:
• Secure four corners and lower parts of the
installation plate with 4 to 6 mounting screws to
install it.
Installation plate
<Keep horizontal direction>
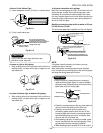
9-2-3. Electrical work
1. The supply voltage must be the same as the rated
voltage of the air conditioner.
2. Prepare the power source for exclusive use with the
air conditioner.
NOTE:
• Wire type : More than H07RN-F or 245 IEC66
(1.0 mm
2
or more)
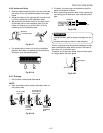
CAUTION
• This appliance can be connected to the mains in
either of the following two ways.
(1) Connection to fixed wiring :
A switch or circuit breake which disconnects
all poles and has a contact separation of at
least 3 mm must be incorporate in the fixed
wiring. An approved circuit breaker or
switches must used.
(2) Connection with power supply plug :
Attach power supply plug with power cord and
plug it into wall outlet. An approved power
supply cord and plug must be used.
NOTE:
• Perform wiring works so as to allow a generous
wiring capacity.