


13
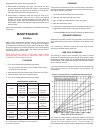
The depth of lime build-up should be measured periodically.
Heaters will have about 3” of lime build-up when the level of lime
has reached the bottom of the cleanout opening or about 1” of
lime build-up if it has reached the drain valve opening. A schedule
for deliming should be set-up; based on the amount of time it
would take for a 1” build-up of lime.
Example 1 = Initial inspection, after 1 year, shows 1/2” of lime
accumulation. Therefore, the heater can be
delimed once a year.
Example 2 = Initial inspection, after 1 year, shows 2” of lime
accumulation. Therefore, the heater should be
delimed every 3 months.
Following are the instructions for performing some of the
recommended maintenance. Power burner inspection and
adjustment should be performed by a competent technician.
Heater failure due to excessive lime build-up voids the warranty.
Sediment and lime scale removal may be accomplished through
the cleanout opening furnished on the heater. The heater must
be drained, see DRAINING, before removing cleanout cover on
tank.
To dissolve and remove the more stubborn mineral deposits,
UN•LIME Professional Delimer should be used.
UN-LIME Delimer is an easy to handle patented food grade acid
formulated specifically for lime scale removal from all types of
water using equipment. Available in 1 gallon (part no. 4763) and
5 gallon (part no. 4813) sizes. Hydrochloric acids are not
recommended for use on glass-lined tanks.
Form no. 4800, entitled, “Why, When and How”, describes tank
cleaning methods and materials. UN•LIME and the booklet may
be obtained through your State dealer or distributor.
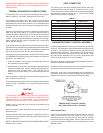
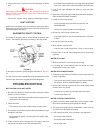
To clean heater through cleanout opening, proceed as follows:
1. Turn off water inlet valve, the heater electrical disconnect switch
and open drain valve.
2. Remove outer cover plate from lower side of heater jacket.
3. Remove plug from cleanout opening.
• Place a short pipe nipple into the tank to extend beyond
the heater jacket.
4. Remove lime, scale and sediment using care not to damage
the glass coatings inside the tank.
5. Remove the nipple.
6. Replace cleanout plug.
7. Follow filling instructions when restoring hot water service..
8. Check for water leakage and correct as necessary.
9. Replace outer jacket cover plate.
RELIEF VALVE
At least twice a year, the temperature and pressure relief valve
should be checked to ensure that it is in operating condition. To
check the relief valve, lift the lever at the end of the valve several
times. The valve should seat properly and operate freely.
CAUTION
BEFORE MANUALLY OPERATING THE VALVE, MAKE SURE
THAT A DRAIN LINE HAS BEEN ATTACHED TO THE VALVE
TO DIRECT THE DISCHARGE TO AN OPEN DRAIN. FAILURE
TO TAKE THIS PRECAUTION COULD MEAN CONTACT WITH
EXTREMELY HOT WATER PASSING OUT OF THE VALVE
DURING THIS CHECKING OPERATION.
If the temperature and pressure relief valve on the heater
discharges periodically or continuously, it may be due to the
thermal expansion of water in a closed water supply system, or it
may be due to a faulty relief valve.
Thermal expansion is the normal response of water when it is
heated. In a closed system, thermal expansion will cause the
system pressure to increase until the relief valve actuation
pressure is equaled. Then, the relief valve will open, allowing
some water to escape slightly lowering the pressure. (See
THERMAL EXPANSION Section of pages 5 and 6).
Contact your water supplier or local plumbing inspector on how
to control this situation.
ABOVE ALL, DO NOT PLUG THE TEMPERATURE AND
PRESSURE RELIEF VALVE. THIS IS NOT A SOLUTION AND
CAN CREATE A HAZARDOUS SITUATION.
POWER BURNER
KEEP THE AREA AROUND THE BURNER CLEAR AND FREE
OF COMBUSTIBLE MATERIALS, GASOLINE OR OTHER
FLAMMABLE LIQUIDS OR VAPORS. DO NOT OBSTRUCT
BURNER AIR OPENINGS OR VENTILATION GRILLES FOR
COMBUSTION AIR. REMOVE LINT ACCUMULATION FROM
AIR INTAKE GRILL.
At least annually, contact a qualified service agency for burner
cleaning and other routine maintenance.
CLEANING FLUES-TPO & TPD ONLY
The following describes how to gain access to the tank flues for
cleaning if necessary.
1. Turn off the heater electrical disconnect switch.
• The switch on the outside of the control compartment
may be used.
2. Remove the vent connector from on top the heater.
3. Remove the jacket top from the heater by taking out the screws
and lifting it off.
• The insulating pad should then be lifted out.
4. Take out the screws holding the flue gas collector top to the
tank and lift off.
5. The flue baffles may now be removed by lifting out.
• The flue baffles are flexible enough to bend for removal
within headroom.