


Initial Settings
75
2
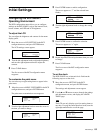
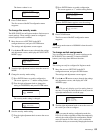
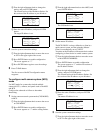
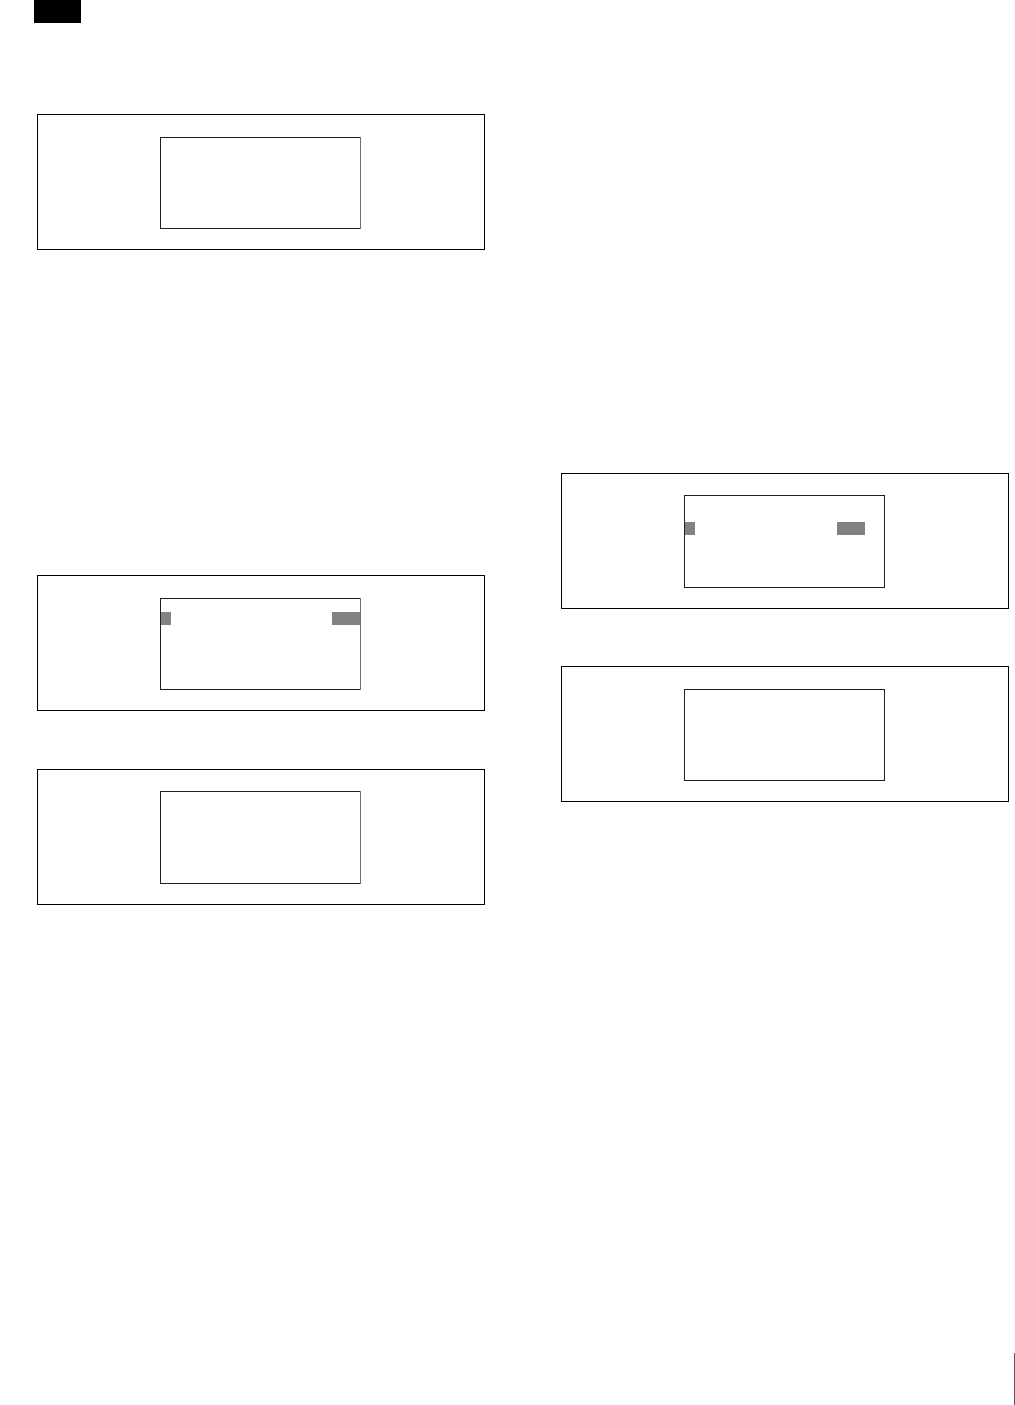
Use the v and V buttons to move through the settings
and adjustment screens, and display the <ETHERNET
IF> page.
Note
The LCD can only display up to four setting items at
one time. If a page has more than four items, turn the
right adjustment knob to scroll the page.
3
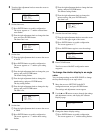
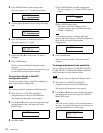
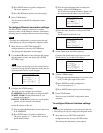
Enable or disable Ethernet interface.
When using Ethernet, enable Ethernet interface.
(Factory setting: OFF)
1 Turn the right adjustment knob to move the cursor
to ETHERNET.
2 Press ENTER button to enable configuration.
The cursor appears as “?” and the setting flashes.
3 Turn the right adjustment knob to change the
setting, and press ENTER button.
The Ethernet interface setting is configured.
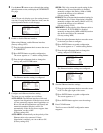
4
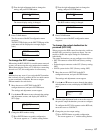
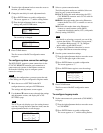
Configure each Ethernet interface setting.
The items you can configure are as follows.
AUTO NEGO: The Ethernet interface of this unit
supports Auto Negotiation. If the devices to which
you are connecting support Auto Negotiation, set
this to ON and the transmission rate (Speed) and
transmission method (Duplex) will be set
automatically. If the devices do not support Auto
Negotiation, set this to OFF.
(Factory setting: ON)
AUTO MDIX: Automatically set the polarity of the
Ethernet cable to be connected. If Auto
Negotiation is enabled, you can set this to ON.
(Factory setting: ON)
SPEED: This is the connection speed setting for the
Ethernet line. If Auto Negotiation is disabled,
manually configure this setting (10M or 100M)
based on the devices to be connected.
(Factory setting: 100M)
DUPLEX: This is the transmission method setting for
the Ethernet line. If Auto Negotiation is disabled,
manually configure this setting (HALF or FULL)
based on the devices to be connected.
(Factory setting: FULL)
MDI/MDIX: Set the polarity of the Ethernet cable to
be connected. If AUTO MDIX is disabled,
manually set the polarity (MDI or MDIX) based on
the devices and cable to be connected.
(Factory setting: MDI)
1 Turn the right adjustment knob to move the cursor
to the item you want to configure.
2 Press ENTER button to enable configuration.
The cursor appears as “?” and the setting flashes.
3 Turn the right adjustment knob to change the
setting, and press ENTER button.
The Ethernet interface settings are configured.
5
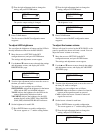
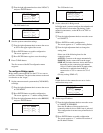
Save the Ethernet interface settings.
1 Turn the right adjustment knob to move the cursor
to SET in the upper right of the screen.
2 Press ENTER button to enable configuration.
The cursor appears as “?.”
3 Press ENTER button again to save the settings.
6
Press CLEAR button.
The first screen of the RCP configuration menu
reappears.
ǽᴹᵂᵑᵅᵂᵏᵋᵂᵑǽᵆᵃᴻǽǽǽǽᵐᵂᵑ
ᴻᵂᵑᵅᵂᵏᵋᵂᵑᴷǽǽǽǽǽǽǽǽᵌᵃᵃ
ǽᴾᵒᵑᵌǽᵋᵂᵄᵌᴷǽǽǽǽǽᴪᴪᴪ
ǽᴾᵒᵑᵌǽᵊᵁᵆᵕᴷǽǽǽǽǽᴪᴪᴪ
ǽᵐᵍᵂᵂᵁᴷǽǽǽǽǽǽǽǽǽᴪᴪᴪᴪ
ǽᵁᵒᵍᵏᵂᵕᴷǽǽǽǽǽǽǽǽᴪᴪᴪᴪ
ǽᵊᵁᵆ¯ᵊᵁᵆᵕᴷǽǽǽǽǽǽᴪᴪᴪᴪ
ǽᴹᵂᵑᵅᵂᵏᵋᵂᵑǽᵆᵃᴻǽǽǽǽᵐᵂᵑ
ᴼᵂᵑᵅᵂᵏᵋᵂᵑᴷǽǽǽǽǽǽǽǽᵌᵋ
ǽᴾᵒᵑᵌǽᵋᵂᵄᵌᴷǽǽǽǽǽᴪᴪᴪ
ǽᴾᵒᵑᵌǽᵊᵁᵆᵕᴷǽǽǽǽǽᴪᴪᴪ
ǽᵐᵍᵂᵂᵁᴷǽǽǽǽǽǽǽǽǽᴪᴪᴪᴪ
ǽᵁᵒᵍᵏᵂᵕᴷǽǽǽǽǽǽǽǽᴪᴪᴪᴪ
ǽᵊᵁᵆ¯ᵊᵁᵆᵕᴷǽǽǽǽǽǽᴪᴪᴪᴪ
ǽᴹᵂᵑᵅᵂᵏᵋᵂᵑǽᵆᵃᴻǽǽǽǽᵐᵂᵑ
ᴻᵂᵑᵅᵂᵏᵋᵂᵑᴷǽǽǽǽǽǽǽǽᵌᵋ
ǽᴾᵒᵑᵌǽᵋᵂᵄᵌᴷǽǽǽǽǽᵌᵋ
ǽᴾᵒᵑᵌǽᵊᵁᵆᵕᴷǽǽǽǽǽᵌᵋ
ǽᵐᵍᵂᵂᵁᴷǽǽǽǽǽǽǽǽǽᴾᵒᵑᵌ
ǽᵁᵒᵍᵏᵂᵕᴷǽǽǽǽǽǽǽǽᴾᵒᵑᵌ
ǽᵊᵁᵆ¯ᵊᵁᵆᵕᴷǽǽǽǽǽǽᴾᵒᵑᵌ
ǽᴹᵂᵑᵅᵂᵏᵋᵂᵑǽᵆᵃᴻǽǽǽǽᵐᵂᵑ
ǽᵂᵑᵅᵂᵏᵋᵂᵑᴷǽǽǽǽǽǽǽǽᵌᵋ
ᴼᴾᵒᵑᵌǽᵋᵂᵄᵌᴷǽǽǽǽǽᵌᵋ
ǽᴾᵒᵑᵌǽᵊᵁᵆᵕᴷǽǽǽǽǽᵌᵋ
ǽᵐᵍᵂᵂᵁᴷǽǽǽǽǽǽǽǽǽᴾᵒᵑᵌ
ǽᵁᵒᵍᵏᵂᵕᴷǽǽǽǽǽǽǽǽᴾᵒᵑᵌ
ǽᵊᵁᵆ¯ᵊᵁᵆᵕᴷǽǽǽǽǽǽᴾᵒᵑᵌ
ǽᴹᵂᵑᵅᵂᵏᵋᵂᵑǽᵆᵃᴻǽǽǽǽᵐᵂᵑ
ǽᵂᵑᵅᵂᵏᵋᵂᵑᴷǽǽǽǽǽǽǽǽᵌᵋ
ᴻᴾᵒᵑᵌǽᵋᵂᵄᵌᴷǽǽǽǽǽᵌᵋ
ǽᴾᵒᵑᵌǽᵊᵁᵆᵕᴷǽǽǽǽǽᵌᵋ
ǽᵐᵍᵂᵂᵁᴷǽǽǽǽǽǽǽǽǽᴾᵒᵑᵌ
ǽᵁᵒᵍᵏᵂᵕᴷǽǽǽǽǽǽǽǽᴾᵒᵑᵌ
ǽᵊᵁᵆ¯ᵊᵁᵆᵕᴷǽǽǽǽǽǽᴾᵒᵑᵌ