


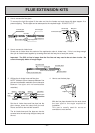
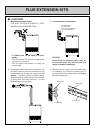
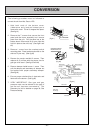

– 37 –
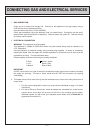
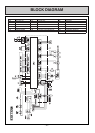
CONNECTING GAS AND ELECTRICAL SERVICES
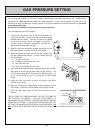
1. GAS CONNECTION.
Purge any air or swarf from the gas line. Connect up the appliance to the gas supply using a
union service cock to facilitate servicing.
Inlet connection size Gas (1/2 inch male BSP)
Check gas soundness using leak detection fluid, not naked flame. Connection can be easily
reached from right hand side rear of appliance. Remove bottom trim (pulls off). Remove louvres
(6 screws) and front panel.
2. ELECTRICAL CONNECTION.
WARNING: This appliance must be earthed.
This appliance is suitable for 230V-50Hz mains only and external wiring must be carried to out
I.E.E. regulations.
Connect appliance to electrical supply using moulded plug supplied. A means of completely
isolating the heater from the supply with contact separation of at least 3mm on all poles must be
provided for servicing. The fuse should be 3amp.
Observe polarity and ensure that wiring is correctly restrained.
E Earth Green / Yellow
L Live Brown / Red
N Neutral Blue or Black
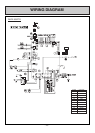
IMPORTANT
Do NOT use a clock or any type of switch on the electrical supply apart from the means of isolating
the supply for servicing. (A clock or switch would also turn OFF the convection fan causing
overheating).
3. This heater has a built-in timer but may also be connected so as to have over-riding control from a
central clock.
1. For time control using built-in clock only, set up clock as described on page 14 of these
Instructions.
2. For use in Offices or Schools etc. where all heaters are connected to a central control
system which shuts down all services at the end of the working day but where
individual heaters can still be set up to separate users needs, refer to Rinnai UK for
appropriate Conversion Kit.