


Regency
®
L900 Direct Vent Gas Fireplace 39
OPERATION
OPERATING
INSTRUCTIONS
1) Read and understand these instructions
before operating this appliance.
2) Check to see that all wiring is correct and
enclosed to prevent possible shock.
3) Check to ensure there are no gas leaks.
4) Make sure the glass in the door frame is
properly positioned. Never operate the
appliance with the glass removed.
5) Verify that the venting and cap are
unobstructed.
6) Ensure that the brick panels are installed.
7) Verify log placement. If the pilot cannot be
seen when lighting the unit, the logs have
been incorrectly positioned.
8) The unit should never be turned off, and on
again without a minimum of a 60 second
wait.
IMPORTANT Gas on/off knob cannot be
turned from "PILOT" to "OFF" unless it is
partially depressed.
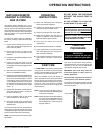
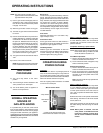
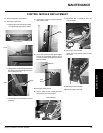
Ensure that the 3 way switch on the manual
control panel is in the "Remote" position.
The manual control panel is located on the left
hand side of the fi rebox behind the left side
exterior brick panel.
During the fi rst few fi res, a white fi lm
may develop on the glass front as part of
the curing process. The glass should be
cleaned after the unit has cooled down
or the fi lm will bake on and become very
diffi cult to remove. Use a non-abrasive
cleaner and DO NOT ATTEMPT TO CLEAN
THE GLASS WHILE IT IS HOT.
Only when the pilot holds, without pressure
being applied to the control knob, resecure the
glass door to the unit. The unit must not be
operated with the glass door removed.
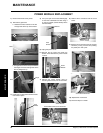
IMPORTANT
To ignite or reignite the pilot, you
must fi rst remove the glass door.
LIGHTING
PROCEDURE
The FIRST FIRE in your heater is part of the paint
curing process. To ensure the paint is properly
cured, it is recommended you burn your fi replace
for at least four (4) hours the fi rst time.
When fi rst operated, the unit will release an
odour caused by the curing of the paint and the
burning off of any oils remaining from manufac-
turing. Smoke detectors in the house may go off
at this time. Open a few windows to ventilate
the room for a couple of hours. The glass may
require cleaning.
NOTE: The main burner will always start on
"HIGH" and resume it's last setting after
20 seconds of operation.
NOTE: When the glass is cold and the appliance
is lit, it may cause condensation and fog
the glass. This condensation is normal
and will disappear in a few minutes as
the glass heats up.
DO NOT ATTEMPT TO CLEAN THE
GLASS WHILE IT IS STILL HOT!
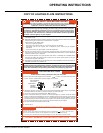
FIRST FIRE
DO NOT BURN THE APPLIANCE
WITHOUT THE GLASS FRONT IN
PLACE.
3-way Switch
MATCHING REMOTE
HANDSET & CONTROL
BOX ID CODE
The Remote Control Handset has a set of
unique ID codes that is pre-programmed into its
memory. This set of ID codes helps to differenti-
ate one Remote Control Handset from another
so that only the control box with a matching ID
code will respond to the appropriate Remote
Control Handset.
To ensure the remote control is matched to
the receiver correctly, please follow the steps
below:
1. Ensure that the Remote Control and the
3-way switch located at the appliance are
both in the OFF position.
2. Ensure that the pilot is lit and the pilot
control knob is in the ON position on the
appliance.
3. Install the 2 x AAA alkaline batteries into the
Remote Control.
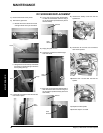
4. Unplug and re-plug the power cord. The
power cord is located on the left hand side
of the appliance and will be plugged into the
receptacle.
5. Switch the 3-way switch located on the ap-
pliance to the REMOTE position.
6. Press and hold the PROG and FAN buttons
simultaneously for up to 20 seconds. During
this time, the remote will display LC while it
is transmitting codes to the receiver. Once
it is successfully transmitted, one will hear
the solenoid click and the burners will come
on. If is does not work the fi rst time, repeat
steps 1 - 6.
7. Release both the PROG and FAN buttons.
The remote will revert back to normal, but
the burner will still be on.
8. Press the ON/OFF button on the remote
control 2 times to turn the burner off.
9. The remote control is now programmed to
the receiver and the appliance can now be
operated with it.
The control box will only learn the Remote ID
codes during the fi rst 30 seconds after power
is applied and will ignore this special command
from the Remote after the fi rst 30 seconds.
NOTE: This must only be performed by a quali-
fi ed installer.
OPERATING INSTRUCTIONS