


I1200 Regency Wood Insert14
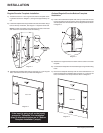
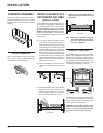
14) Cut the bottom edge of the fan support and bottom faceplate (using
a metal cutting blade) to the length measured in step 13.
15) Remove the fan assembly from the ash lip of the insert and position
the fan support to the bottom of the fan assembly.
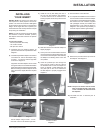
16) Drill 4 x 5/32" holes to the underside of the fan assembly using the
holes in the fan support as a guide. See Diagram 9.
17) Secure the fan support to the fan assembly using 4 self tapping
screws. See Diagram 9.
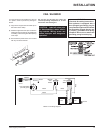
Diagram 9: Rear / Bottom View
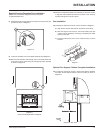
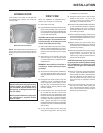
18) Secure the bottom faceplate to the 3-sided faceplate using the 4
supplied bolts/washers.
19) Discard both side trims that were included with the regular/oversize
faceplate and replace with the new extended trims supplied with the
fan support/bottom faceplate. Cut to desired length.
20) Fit the trim assembly over the faceplate assembly. See Diagram 6.
21) Drill two 5/32" diameter holes through the trim and side panels and
screw the trim to the panels using the self tapping screws provided
as shown in Diagram 6.
22) Re-attach the fan/fan support assembly to the ash lip of the insert.
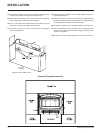
Completed Faceplate Assembly
INSTALLATION