


I1200 Regency Wood Insert12
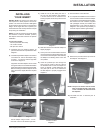
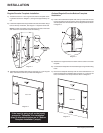
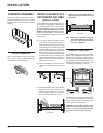
Regular/Oversize Faceplate Installation:
1) Thread the black 1/4" x 3/4" long hex bolts into the faceplate mount-
ing bracket as shown in Diagram 1, leaving them approximately 1/4"
out.
2) Fasten the faceplate mounting bracket to the side of the insert using 2
bolts for the top and bottom, see Diagram 1. Repeat for other side.
NOTE: The bolt and washer come attached to the side of the insert
and need to be removed and reused for fastening.
Diagram 1
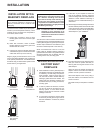
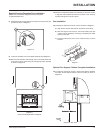
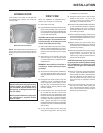
3) Assemble the faceplate sides and top using the 1/4" x 1/2" long hex
bolts, lock washers and nuts provided. See Diagram 2.
Diagram 2
Rear View
4) Position the assembled faceplate side and top to the insert. Ensure
to align the draft rod into the opening of the faceplate as well as the
side faceplate slots with the bolts in the mounting brackets as shown
in Diagram 3.
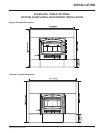
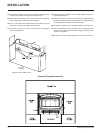
5) Measure the height between the hearth and the bottom of the side
faceplate.
6) Cut the bottom faceplate to the measured height using a metal cutting
blade.
7) Remove the faceplate assembly from the insert and attach the cut
bottom faceplate to the faceplate sides using the 1/4" x 1/2" long hex
bolts, lock washers and nuts provided as shown in Diagram 4.
Diagram 3
Rear View
Diagram 4
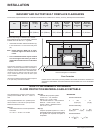
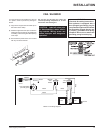
Optional Regular/Oversize Bottom Faceplate
Installation:
If the insert is going to sit on the hearth
proceed to "Faceplate Trim Installation"
(step 8) otherwise continue on to "Bottom
Faceplate Installation" (step 4).
INSTALLATION