


2
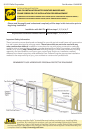
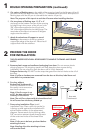
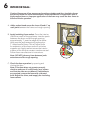
PREPARE THE DOOR
FOR INSTALLATION:
TWO OR MORE PEOPLE WILL BE REQUIRED TO HANDLE THE PANEL AND FRAME
SAFELY.
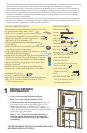
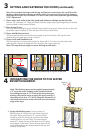
A. Remove plastic wrap and cardboard packaging from door. Do not remove plastic
shipping spacers. The shipping spacers will help keep the door square during
installation. Do not unlock or open the door until it is fully fastened.
Designer Series only: DO NOT cut the strap that goes from the lock holes to the sill of
the door.
Note: If grilles or hardware are removed from the door at this time, label them and
store them in a protected area.
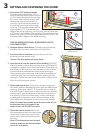
B. For door without
EnduraClad® brickmould:
Fold out installation n to 90°.
Be careful not to remove or
tear the fin corners.
Note: If the fin corner is not
at 90°, the door will not align
correctly on the interior.
Note: The nail fin on doors with brickmould and nail
fin will come from the factory folded up.
2B
1
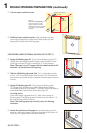
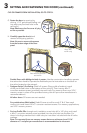
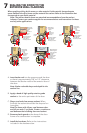
ROUGH OPENING PREPARATION (continued):
Door with
Brickmould
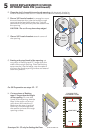
R. Cut a piece of flashing tape to the width of the opening. Install to the flanges of the sill
pan and overlap the tape from step 1N by 1". If needed add a second or third piece of
flashing tape until the sill pan is covered to the interior sill pan lip.
Note: The purpose of this tape is to seal the sill screws when installing the door.
S. Cut two pieces of flashing tape 1-1/2" x 6"
and apply to the bottom corners of the opening
by beginning in the corner of the sill pan, with
3/4" of the tape applied to the sill pan and
3/4" of the tape applied to the side flange. The
remainder of the tape is to be at a 45 degree
angle onto the exterior.
T. Attach the aluminum sill support or wood
blocking to the exterior of the box plate to
support the edge of the door sill. Place the sill
support flush with the subfloor.
EXTERIOR SILL PAN LIP
INTERIOR SILL PAN LIP
1"
EXTERIOR SILL PAN LIP
INTERIOR SILL PAN LIP
1P
1T
1S
1R
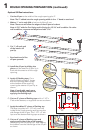
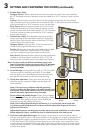
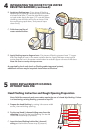
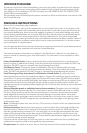
C. Doors using Installation Clips: Install
installation clips. Place each clip so the lip
is facing up and against the installation fin
at the locations shown in the placement
diagram. Secure each clip by driving a #6 x
5/8" corrosion resistant screw through each
of the outer two holes of the three holes
shown.
Note: If clips are to be bent; pre-bend before
attaching to frame.
Note: Bending clips after attaching to frame
will bow the frame.
6“ from end
Lip
#6 x 5/8” corrosion
resistant screws
2C