


FOR DOORS USING OPTIONAL SILL PAN GO TO STEP 1I.
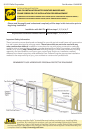
Exterior
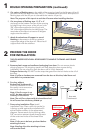
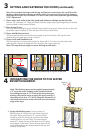
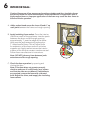
1D
4th cut:
Make a 6" cut up from
each top corner at a 45
o
angle to allow the water
resistive barrier to be lapped
over the fin at the head of
the door.
1st cut
2nd cut
3rd cut
Water Resistive Barrier
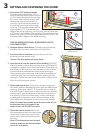
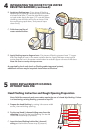
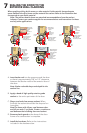
1C
C. Cut the water resistive barrier.
D. Fold the water resistive barrier. Fold side flaps into the
opening and staple to inside wall. Fold top flap up and
temporarily fasten with flashing tape.
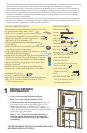
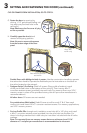
E. Apply sill flashing tape #1. Cut a piece of flashing tape 12"
longer than the opening width. Apply at the bottom of the
opening as shown (IE) so it overhangs 1" to the exterior.
Note: The tape is cut 12" longer than the width so that it will
extend 6" up each side of the opening.
F. Tab the sill flashing tape and fold. Cut 1" wide tabs at each
corner (1/2" from each side of the corner) (1F). Fold tape to
the exterior and press firmly to adhere it to the water resistive
barrier.
1F
1"
1/2"
1/2"
6"
1E
1"
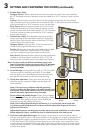
1G
G. Apply sill flashing tape #2. Cut a piece of flashing tape
12" longer than the opening width. Apply at the bottom,
overlapping tape #1 by at least 1". DO NOT allow the tape to
extend past the interior face of the framing (1G).
In-swing doors:
If the wall depth is greater than 5", add a third piece of
flashing tape. The flashing tape should come to within 1" of
the interior face of the framing.
Note: The flashing tape may not fully cover the framing
members.
1H
H. Attach the aluminum sill support or wood blocking to the
exterior of the box plate to support the edge of the door sill.
Place the sill support flush with the subfloor.
GO TO STEP 2
1
ROUGH OPENING PREPARATION (continued):