8
<How to Set the Weekly Timer>
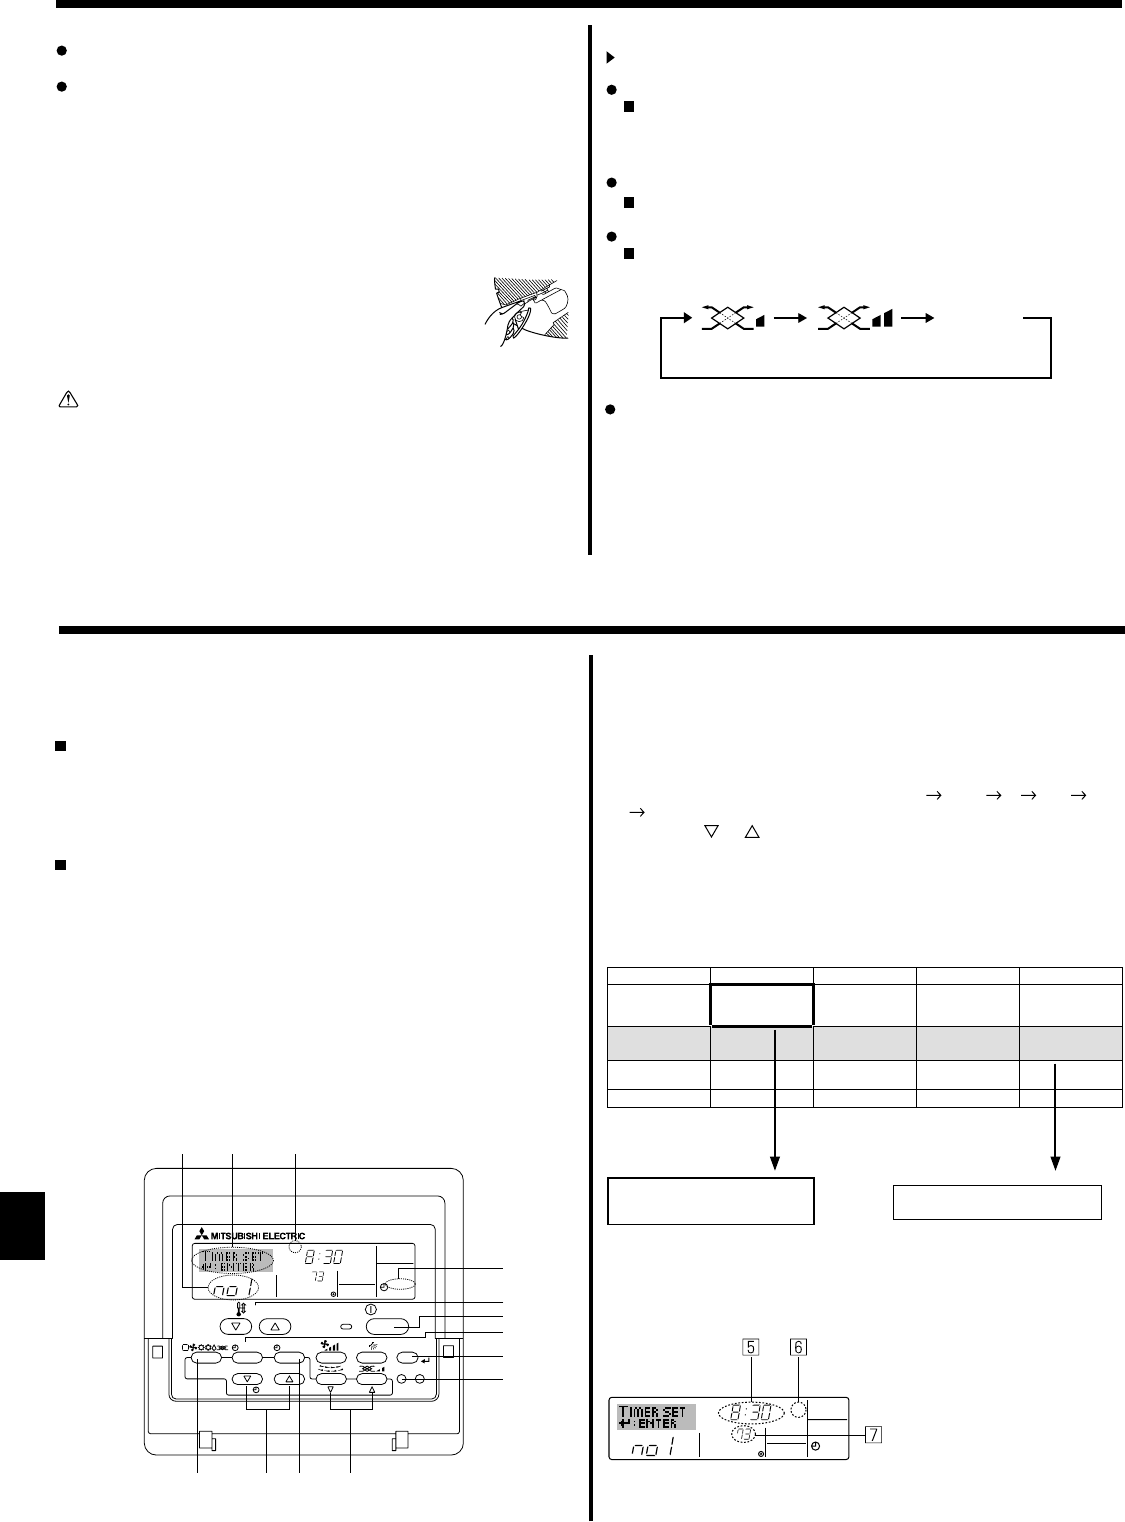
1. Be sure that you are at a standard control screen, and that the weekly
timer indicator
1
is shown in the display.
2. Press the Timer Menu button
2
, so that the “Set Up” appears on the
screen (at
2
). (Note that each press of the button toggles the display
between “Set Up” and “Monitor”.)
3. Press the Timer On/Off (Set Day) button
9
to set the day. Each press
advances the display at
3
to the next setting, in the following se-
quence: “Sun Mon Tues Wed Thurs Fri Sat”
“Sun” ... “Fri” “Sat”
“Sun Mon Tues Wed Thurs Fri Sat”...
4. Press the
or Operation button (
7
or
8
) as necessary to select
the appropriate operation number (1 to 8)
4
.
* Your inputs at Steps 3 and 4 will select one of the cells from the
matrix illustrated below.
(The remote-controller display at left shows how the display would
appear when setting Operation 1 for Sunday to the values indicated
below.)
Setup Matrix
Op No. Sunday Monday … Saturday
No. 1
• 8:30
• ON
• 73°F
No. 2
• 10:00
• OFF
• 10:00
• OFF
• 10:00
• OFF
• 10:00
• OFF
…
No. 8
6.1. For Wired Remote-controller
You can use Function Selection of remote controller to select which of
three types of timer to use:
1
Weekly timer,
2
Simple timer or
3
Auto
Off timer.
6.1.1. Weekly Timer
The weekly timer can be used to set up to eight operations for each
day of the week.
• Each operation may consist of any of the following: ON/OFF time
together with a temperature setting, or ON/OFF time only, or tem-
perature setting only.
• When the current time reaches a time set at this timer, the air condi-
tioner carries out the action set by the timer.
Time setting resolution for this timer is 1 minute.
Note:
*1. Weekly Timer/Simple Timer/Auto Off Timer cannot be used at
the same time.
*2. The weekly timer will not operate when any of the following con-
ditions is in effect.
The timer feature is off; the system is in an malfunction state; a
test run is in progress; the remote controller is undergoing self-
check or remote controller check; the user is in the process of
setting a function; the user is in the process of setting the timer;
the user is in the process of setting the current day of the week
or time; the system is under central control. (Specifically, the
system will not carry out operations (unit on, unit off, or tem-
perature setting) that are prohibited during these conditions.)
˚F
SUN
ON
WEEKLY
PAR-21MAA
ON/OFF
FILTER
CHECK
OPERATION
CLEAR
TEST
TEMP.
MENU
BACK DAY
MONITOR/SET
CLOCK
ON/OFF
Operation No.
Day Setting
6. Timer
5. Operation
<Operation 1 settings for Sunday>
Start the air conditioner at 8:30, with
the temperature set to 73 °F
<Operation 2 settings for every day>
Turn off the air conditioner at 10:00.
˚F
SUN
ON
WEEKLY
Shows the selected operation (ON or OFF)
* Does not appear if operation is not set.
Shows the temperature setting
* Does not appear if temperature is
not set.
Shows the time set-
ting
(Low)
(High)
No display
(Stop)
(OFF)
5.6. Ventillation
For LOSSNAY combination
5.6.1. For Wired Remote-controller
To run the ventilator together with the indoor unit:
Press the ON/OFF button
1
.
•
The Vent indication appears on the screen (at
8
). The ventilator
will now automatically operate whenever the indoor unit is running.
To run the ventilator only when the indoor unit is off:
Press the Ventilation button
8
while the indoor unit is off.
• The On lamp (at
1
) and the Vent indication (at
8
) come on.
To change the ventilator force:
Press the Ventilation button
8
as necessary.
• Each press toggles the setting as shown below.
Note:
With some model confi gurations, the fan on the indoor unit may
come on even when you set the ventilator to run independently.
Note:
By setting the day to “Sun Mon Tues Wed Thurs Fri Sat”, you can
set the same operation to be carried out at the same time every day.
(Example: Operation 2 above, which is the same for all days of the
week.)
<[Manual] To Change the Airfl ow’s Left/Right Direction>
* The louver button
7
cannot be used.
• Stop the unit operation, hold the lever of the louver,
and
adjust to the desired direction.
* Do not set to the inside direction when the unit is
in the cooling or drying mode because there is a
risk of condensation and water dripping.
Caution:
When you operate the process above, be sure to take measures to
avoid falls.
Note:
Available directions depend on the type of unit connected. Note
also that some units do not provide an “Auto” setting.
In the following cases, the actual air direction will differ from the
direction indicated on the remote controller display.
1. While the display is showing “STAND BY” or “DEFROST”.
2. Immediately after starting heater mode (while the system is
waiting for the mode change to take effect).
3. In heat mode, when room temperature is higher than the tem-
perature setting.


