


60
1. Removing the compressor
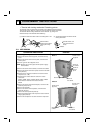
(1) Remove the screws of the top panel, and remove the top
panel.
(2) Remove the screws of the service panel, and remove the
service panel.
(3) Recover gas from the refrigerant circuit.
NOTE : Recover gas from the pipes until the pressure gauge
shows 0 PSIG.
(4) Remove the screws of the front panel, and remove the front
panel.
(5) Remove the screws of the rear panel, and remove the rear
panel.
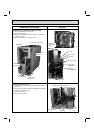
(6) Disconnect the compressor lead wire from terminal of
compressor (U, V, W).
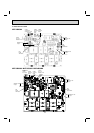
(7) Disconnect the outdoor electronic control P.C. board
connectors:
CN661, CN663, CN681, CN791, CN792, CN793,
CN794 (MXZ-4B36NA), CN796, CN931, CN932
Disconnect the noise filter P.C. board connector:
CN912
(8) Remove the screws of the electrical parts, and remove the
electrical parts.
(9) Remove the propeller.
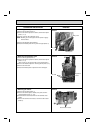
(
10
) Remove the screws of the separator, and remove the
separator.
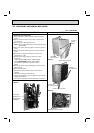
(
11
) Remove the sound proof felt (Photo 5).
(12)
Detach the welded parts of the compressor suction and dis-
charge pipes (Photo 4).
(13)
Remove the compressor nuts and remove the compressor.
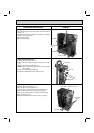
OPERATING PROCEDURE
PHOTOS
Photo 1
Photo 2
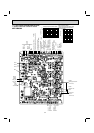
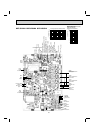
12-2. MXZ-3B24NA MXZ-3B30NA MXZ-4B36NA
Photo 3
Screws of the top panel
Screws of the top panel
Screws of
the side panel
Screws of
the front panel
Screws of
service
panel
Screws of
the service panel
Screws of the rear panel
Screws of the electrical parts
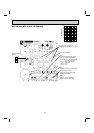
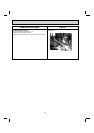
Photo 4
Discharge pipe
welded part
Suction pipe
welded part
Photo : MXZ-3B24NA