


En-4
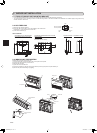
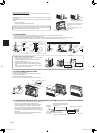
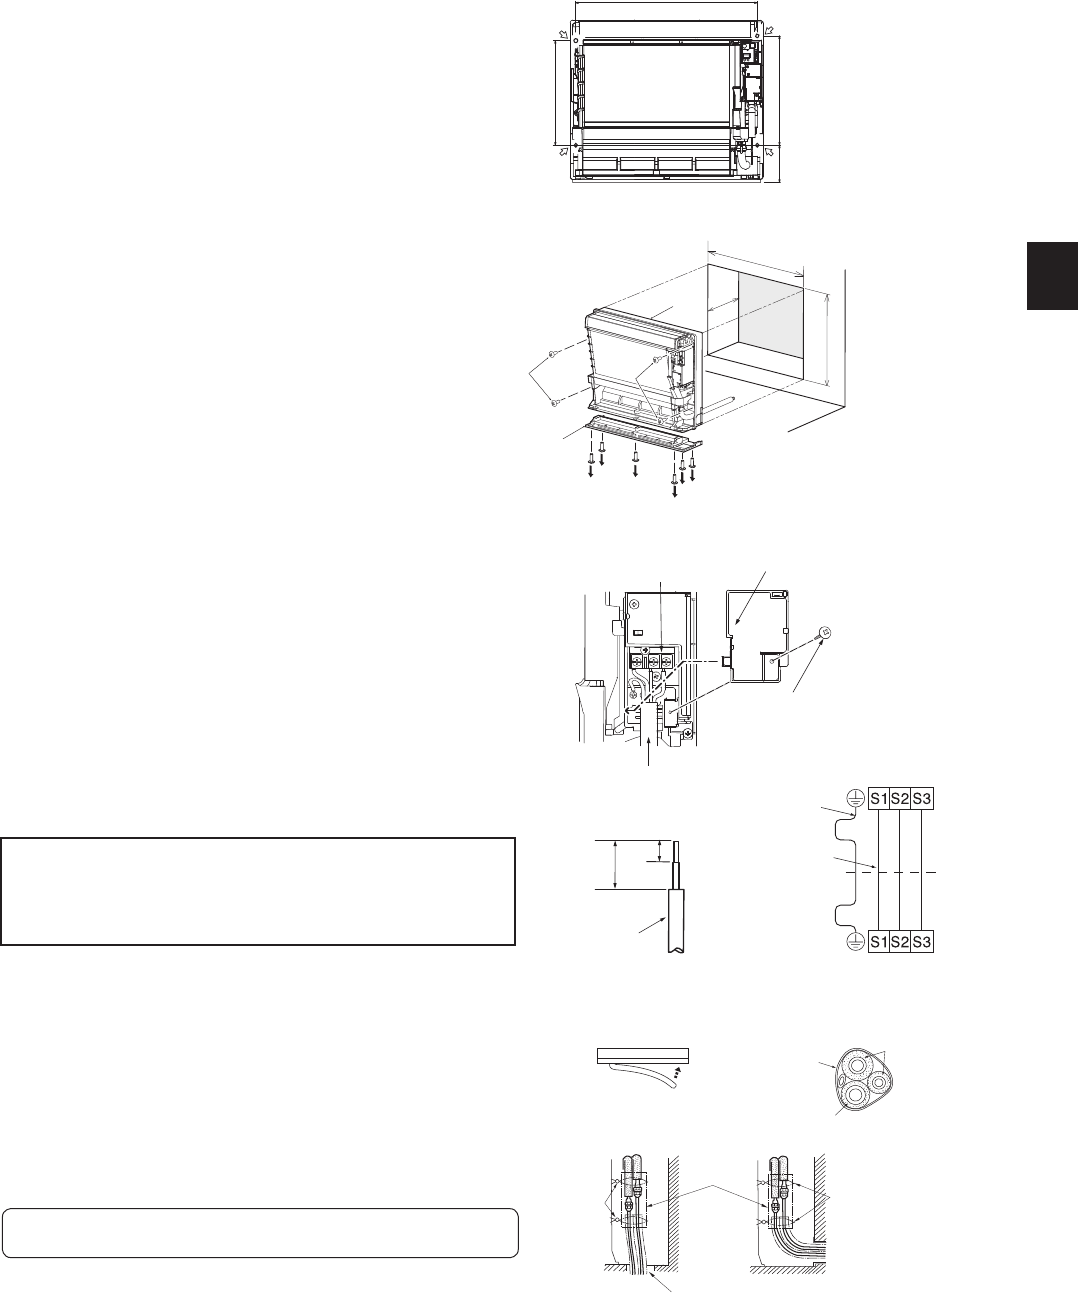
2-4-3. EMBEDDING THE INDOOR UNIT IN A WALL
1.Makeaholeinthewall.
2.Usingreinforcementmaterial,adjustthedepth.
3.Remove6screwsthatxthebasetotheunit.Removethebasefrom
theunit.
4.Fixtheindoorunitat4pointswiththeincludedwoodscrews(9)and
washers(10).Tightenthescrewssecurely.
4
575
740
70
4
3
3
3
3
3
3
705
2-4. INDOOR UNIT INSTALLATION
2-4-1. INSTALLING THE INDOOR UNIT ON THE FLOOR
1.Placetheindoorunitontheatoor.
2.Fixtheindoorunitat4pointswiththeincludedwoodscrews(9)and
washers(10).Tightenthescrewssecurely.
2-4-2. MOUNTING THE INDOOR UNIT ON THE WALL
1.Hookthetopoftheindoorunitontheindoorunitmountingbracket(7).
2.Fixtheindoorunitat4pointswiththeincludedwoodscrews(9)and
washers(10).Tightenthescrewssecurely.
405
137
387
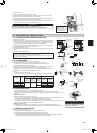
Indoorterminalblock
Indoor/outdoorunit
connectingwire(A)
Outdoorterminalblock
Earthwire
(green/yellow)
• Makeearthwirealittlelongerthanothers.(Morethan45mm)
• Forfutureservicing,giveextralengthtotheconnectingwires.
• Donotfoldtheexcesswire,orcramitintosmallspace.Takecautionnotto
damagethewires.
• Besuretoattacheachscrewtoitscorrespondentterminalwhensecuringthe
cordand/orthewiretotheterminalblock.
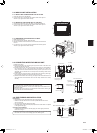
2-5. CONNECTING WIRES FOR INDOOR UNIT
1)RemoveVAclamp.
2)Passindoor/outdoorunitconnectingwire(A)fromthebackoftheindoorunit
andprocesstheendofthewire.
3)Loosenterminalscrew,andconnectrsttheearthwire,thenindoor/outdoor
unitconnectingwire(A)totheterminalblock.Becarefulnottomakemis-
wiring.Fixthewiretotheterminalblocksecurelysothatnopartofitscoreis
appeared,andnoexternalforceisconveyedtotheconnectingsectionofthe
terminalblock.
4)Firmlytightentheterminalscrewstopreventthemfromloosening.Aftertight-
ening,pullthewireslightlytoconrmthattheydonotmove.
5)Secureindoor/outdoorunitconnectingwire(A)andtheearthwirewiththeVA
clamp.NeverfailtohooktheleftclawoftheVAclamp.AttachtheVAclamp
securely.
Terminalblock
Fixingscrew
Indoor/outdoorunit
connectingwire(A)
VAclamp
Leadwire
35mm
15mm
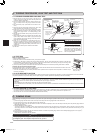
2-6. PIPE FORMING AND INSTALLATION
Pipe Forming
• Routethedrainhosediagonallybelowtheconnectingpipes.
• Makesurethatthedrainhoseisnotroutedupwardandthatthereareno
wavesinthehose.
• Donotpullthehosewhenapplyingthetape.
• Routethepipingsothatitdoesnotprojectpasttherearoftheindoorunit.(Refer
totheguretotheright.)
Connecting Pipe Installation
• Installtheconnectingpipessothatthepipingcanmoveslightlytothefront,
back,left,andright.
Piping
tape
Drainhose
Refrigerant
piping
Pipingbentout-
ward
Push
• Besuretoinsulatetheconnectingpipessothattheydonotcontactthepanel.
• Becarefulnottocrushtheconnectingpipeswhenbendingthem.
Removethecover.
RIGHTDOWNWARDPIPING OTHERPIPING
Band(5)
Pipecover(4)
Band(5)
Reinforcement
material
Unit
Base
JG79A867H02_en.indd 4 2014/06/25 13:38:58