


Pressing this button will write default values of all
temperature programs and setup menus into the unit’s
nonvolatile memory. Take care not to unintentionally
press this button when the thermostat has been
removed from the wall plate!
4.4. PROGRAMMING
You can change the preset time/and temperatures to suit
your schedule for each day of the week. Each day has
four consecutive periods. They are Morning, Day,
Evening, and Night. Separate set points are provided for
Heat and Cool.
Fan programming is similar to temperature program-
ming. It has four consecutive periods, which are inde-
pendent of the four temperature periods. The default set-
ting for your systems fan requires it to run only as
required by your environmental system. It may be pro-
grammed to maintain a minimum run time on an hourly
basis, or run continuously.
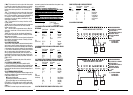
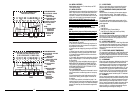
4.4.1 WEEKDAY TEMPERATURE PROGRAMMING
●
Rotate the dial to Set Weekday Programs. The heat
and cool set points will be displayed on the left side of
the display. The start time for the displayed day will flash
to show that this is the setting currently ready for edit.
●
Use the up or down arrow keys to change the start
time for this period. One period ends at the start time of
the next period. The beginning of that period may not be
any closer to the beginning of the next period than one
15 minute increment.
●
Press NEXT to accept the displayed start time and
advance to edit the heat set point. It will be flashing.
●
Use the up or down arrow keys to change Heat Set to
the temperature you desire.
●
Press NEXT to accept the displayed heat set point to
the temperature and advance to edit the cool set point. It
will be flashing.
●
There is a minimum value that must be maintained
between the heat temperature set point and Cool temper-
ature set point. The value that must be maintained is
called the Deadband. It is programmable and may be
changed in the Installer Setup menu. If you move the
heat set point temperature to close to the cool set point
temperature the cool set point temperature will move
away from the heat set point temperature to maintain the
dead band. Conversely the heat set point temperature will
move if you adjust the cool set point temperature to
close. There are programmable limits for both heat and
cool, which you will not be able to exceed. These values
are accessible from the User Setup Menu.
●
When you have changed the Cool set point to your
desired temperature, press NEXT to advance to the next
period. Its start time will be flashing indicating that it is
under edit.
●
When all the periods for a day have been set, the start
time for the next weekday will be displayed to begin edit-
ing the settings for that day.
●
Rotate the dial back to RUN to and accept all current
values and end the programming session.
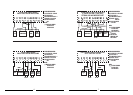
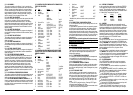
4.4.2 WEEKDAY FAN PROGRAMMING
Programming fan operation is similar to programming
the temperature periods and set points. Fan periods are
independent of temperature periods and are designated
P1, P2, P3, P4.
●
Rotate the dial to Set Weekday Programs, then press
and hold the FAN button for over 2 seconds.
●
The fan day and period will be displayed in the top
center and right portion of the screen. The bottom por-
tion will show the fan mode and start time for that period.
The fan mode for this period will be flashing to indicate
that it may be changed with the UP/DOWN arrow keys.
Choices are:
■
Auto:
default value; the fan will run only when neces-
sary for your HVAC system to maintain temperature con-
trol.
■
Program:
This mode will insure that during every
hour, the fan will run for the for at least the number of
minutes shown at the top left of the display, beginning at
the displayed time for this period until the beginning of
the next period. If your heating or cooling requirement
fulfills the minimum fan run time, additional fan run time
will not be requested. Activation of the fan when neces-
sary is done at twenty minute intervals for one third the
hourly run time.
■
On:
The On setting will run the fan continuously dur-
ing this period.
●
Set the desired Fan mode for his period. Press NEXT
to advance and edit this periods start time.
●
Use the UP or DOWN arrow keys to change the start
time. A period ends at the start time of the next period.
The beginning of a period may not be any closer to the
beginning of the next period than one 15 minute incre-
ment.
●
Press NEXT to advance and set the minimum fan run
time if this period is to use program mode.
●
Pressing NEXT again will bring you to the next period’s
mode.
●
When all the periods for a day have been set, the start
time for the next weekday will be displayed to begin edit-
ing the settings for that day.
●
The sequence of days that you may program pro-
gresses the weekdays MON - FRI, and repeats.
●
Then press and hold the FAN button for over 2 sec-
onds to return to Weekday temperature editing or rotate
the dial back to RUN to and accept all current values and
end the programming session.
4.4.3 WEEKEND PROGRAMMING
Weekend programming is identical to weekday program-
ming except rotate the dial to set weekend programs, and
the sequence of days that you may program is SAT, SUN
and then repeating this two day sequence.
15
4.3.3 VACATION HOLD
Use this feature to instruct the thermostat to hold a fixed
temperature for a period of from 1 to 30 days.
●
Verify that the unit is in Heat, Cool or AUTOCHANGE
with a temperature set point visible. The unit must be
have a temperature set point visible to enter Vacation
Hold mode.
●
Press and hold the HOLD button for approximately
three seconds.
●
Use the UP/DOWN arrow keys to adjust the number of
days to your preference. The maximum number of
allowed days is 30.
●
Press NEXT. The thermostat will display the number of
days remaining in this Vacation Hold.
●
If the unit is in Heat mode, it will now maintain a mini-
mum temperature by controlling your heating system. If
the unit is in Cool mode, it will now maintain a maximum
temperature by controlling your cooling system.
●
The Vacation Hold will be complete when there are no
remaining days left and the unit will resume using the
temperature programs stored in its memory.
●
A Vacation Hold may also be terminated prematurely
by Pressing the HOLD button again, changing the mode
of the system, or rotating the dial.
4.3.4 DAYLIGHT SAVINGS TIME ADJUSTMENT (DST)
This button is labeled DST. When pressed it shifts the
units clock time in a three press sequence. A first press
will add 1 hour to the displayed time. A second press
subtracts one hour from the original time, and a third
press returns the unit to the original time. After one
minute with no new DST button presses, the sequence is
reset staring with the current displayed time.
4.3.5 AIR FILTER
This unit incorporates a timer, which records the number
of hours the thermostat has activated the fan. This timer
is intended to indicate when your HVAC systems filter
should be cleaned or replaced.
●
Refer to the User setup menu to set the number of
hours the timer will use to indicate that changing the filter
is recommended.
●
To view the number of hours the thermostat has acti-
vated the fan since the last timer reset, rotate the dial to
the AIR FILTER position.
●
To reset the timer press the UP or Down arrow key
once. Pressing an arrow key again will toggle between
0000 and the current value. The value in display when
you exit this mode will be the value retained in memory.
Leave the value at 0000 to reset the timer.
●
To exit the AIR FILTER mode, rotate the dial to another
position.
4.3.6 ENERGY USAGE
Your thermostat records the total number of hours the
thermostat has activated heating and cooling with six
separate timers. They measure:
●
Today’s cumulative heating time
●
Today’s cumulative cooling time
●
Yesterdays cumulative heating time
●
Yesterdays cumulative cooling time
●
Total cumulative heating time
●
Total cumulative cooling time
To view this set of timer values:
●
Rotate the dial to the ENERGY USAGE position. Timer
values will repeatedly display the above sequence.
●
The cumulative timers may be reset by pressing the
UP or Down arrow key once. Pressing an arrow key
again will toggle between 00:00 and the current value.
Pressing the UP or Down arrow key also stops the scroll-
ing.
●
Press NEXT to resume scrolling.
●
When you rotate the dial to another mode, the current
values will be the values retained in memory. Leave the
value at 00:00 to reset the cumulative timers.
4.3.7 FUTURE OUTDOOR SENSOR
An optional outdoor sensor may be installed to enable
the thermostat to display the temperature outside your
home. This sensor may also be used to instruct the unit
to switch from a heat pump to another source of heat.
Once installed the outdoor temperature will alternate with
the time in the display. To install an outdoor sensor refer
to the Installation Section of this manual. To enable an
outdoor sensor or change heat pump settings refer to the
Installers Setup Section of this manual.
4.3.8 FUTURE REMOTE INDOOR SENSORS
Up to three optional indoor sensors may be installed. The
temperature measurements of all active indoor sensors
will be averaged and used in temperature control. With
remote indoor sensors functioning, the units’ internal
temperature sensor may be enabled or disabled to allow
the thermostat to be mounted in locations that would
otherwise be non-ideal.
To install indoor temperature sensors refer to the
Installation Section of this manual. To enable or disable
the units internal sensor or other remote indoor tempera-
ture sensors refer to the Installers Setup Section of this
manual.
4.3.9 RESET
There are two RESET buttons on the rear of the unit’s cir-
cuit board. They are the Hardware and Software RESET
buttons.
4.3.9.1 HARDWARE RESET (H/W RESET)
The H/W RESET button restarts your thermostats pro-
gram at the beginning of normal operation. This button is
generally of little use to an owner.
4.3.9.2 SOFTWARE RESET (S/W RESET)
The S/W RESET button restarts your thermostats pro-
gram at initialization. It may be used to reset every pro-
grammable value to it’s default setting.
14