


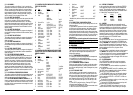


16 Outdoor Sensor
(future) NA/ON/OFF NA/OFF
17 Internal Temp Sensor ON / OFF ON
18 Remote Sensor 1
(future) NA/ON/OFF NA/OFF
19 Remote Sensor 2
(future) NA/ON/OFF NA/OFF
20 Remote Sensor 3
(future) NA/ON/OFF NA/OFF
*Available only with an outdoor sensor present and
enabled
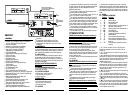
3.7.4 COMPLETING YOUR INSTALLATION
●
Turn the power back on to your heating and/or air con-
ditioning system.
●
Verify that the system and its fan are operating proper-
ly. When set to a high temperature, the heating system
should provide warm air after a short time. Likewise a
cooling system should provide cool air after a short time.
Usually sound from the furnace and air conditioning units
can be heard while they are running. The rush of moving
air should be heard within a short time after either has
been started.
NOTE: If you have an electric system and the blower does not
operate after installation, verify that the electric/gas option in
installer set up is set to Electric.
●
Installation is now complete.
4. OPERATION
4.1. OPERATING BASICS
4.1.1 UP/DOWN ARROW CHANGE KEYS
There are two arrow keys just the right of the units dis-
play. They are used to adjust set temperatures, and
change other settings.
4.1.1.1 TEMPERATURE ADJUSTMENT
●
Pressing an arrow key once adjusts a set temperature
by one degree in the associated direction.
❷
Holding the key will automatically advance the setting
in the associated direction.
4.1.1.2 CHANGING OTHER SETTINGS
If there are many choices for a value, usually that setting
will automatically advance by holding one of the arrow
keys. Some settings though, must be changed one press
at a time.
4.1.2 SET DAY AND TIME
The time used by your thermostat for temperature con-
trol is that displayed by the unit. To set the correct time
after the unit has been unpowered or after software reset:
●
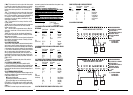
Open the drop down door on the front of the thermo-
stat. Rotate the dial to the SET DAY/TIME position. Use
the UP key to advance the day to the current day of the
week.
●
Press NEXT to adjust the time. Pressing NEXT again
will toggle from Set Day to Set Time.
●
Use the UP or DOWN key to set the thermostats clock.
●
Return the dial to its RUN position.
4.1.3 DEFAULT PROGRAM
●
As supplied from the factory, the following ENERGY
STAR approved program will be used for temperature
control. This program and all other settings maybe
restored to their default values via a SOFTWARE RESET.
●
Default Daily Temperature Program
Period Heat Mode Cool Mode
Morning 6:00 AM 70°F 6:00 AM 78°F
Day 8:00 AM 62°F 8:00 AM 85°F
Evening 6:00 PM 70°F 6:00 PM 78°F
Night 10:00 PM 62°F 10:00 PM 82°F
4.1.4 MODES
Because of your thermostats great versatility not all
modes will be applicable to your application. The mode
selections available to you are determined by settings in
the Installer Setup Menu. Often the unit’s mode is dis-
played during program run. When a unit has first been
powered up with the dial in the Run position, your ther-
mostat will begin to control your heating and/or air con-
ditioning system according to it’s default ENERGY STAR
approved program in AUTOCHANGE mode.
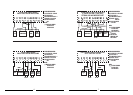
4.1.4.1 OVERRIDE
During run, either the Heat or Cool set point temperature
may be altered with the temperature UP/DOWN arrow
button.
T Override
will be displayed in line two of the dis-
play. The adjusted temperature will remain the set tem-
perature until the next program period begins. Then, tem-
perature settings will return to program control.
4.1.4.2 HOLD
Press this button to indefinitely maintain a fixed tempera-
ture.
HOLD
will be displayed in line two of the display.
●
Press this button once to enter permanent temperature
HOLD from program run or temperature OVERRIDE.
●
Pressing this button again will toggle HOLD off return-
ing to program RUN.
4.1.4.3 AUTOCHANGE
The AUTOCHANGE mode allows your thermostat to
switch between Heat and Cool modes of temperature
control automatically.
●
AUTOCHANGE may not be available or applicable in
your installation.
●
To enter AUTOCHANGE mode if it is available, press
the MODE button repeatedly until the display indicates
that the unit is in AUTOCHANGE mode.
●
In AUTOCHANGE mode, you can determine whether
your thermostat will call for heating or cooling (at that
time) by whether HEAT SET or COOL SET is visible on
the units display.
●
To switch from heating to cooling or vise versa, press
both arrow keys at the same time.
●
Pressing the UP/DOWN temperature arrow keys will
adjust the active, visible set temperature.
●
When AUTOCHANGE is first entered, the unit may
need to determine which if either heating or cooling is
11
3.7.1.10 SWING 2
This value is similar to the Swing 1, but it controls the
temperature variation the system allows above and below
Swing 1’s lower limit before calling for a second stage.
Once a second stage is activated, it will remain on until
the temperature set point has been reached. If a third
stage of heat is present in heat pump mode, Swing 2 is
used to control it from the stage 2 lower limit.
3.7.1.11 HEAT FAN CONTROL
Fossil fuel furnaces normally control the system fan while
the furnace is operating. Electric systems normally
require the thermostat to activate the fan. This setting
instructs the thermostat how to handle fan control during
heating. Electric heat and heat pumps generally require
the thermostat to activate the fan and therefore use the
electric setting.
3.7.1.12 HEAT FAN ON DELAY
This setting allows the installer to program the length of
time between heating activation and fan activation (delay
on make).
3.7.1.13 HEAT FAN OFF DELAY
This setting allows the installer to program the length of
time between heating deactivation and fan deactivation
(delay on break).
3.7.1.14 COOL FAN ON DELAY
This setting allows the installer to program the length of
time between cooling activation and fan activation (delay
on make).
3.7.1.15 COOL FAN OFF DELAY
This setting allows the installer to program the length of
time between cooling deactivation and fan deactivation
(delay on break).
3.7.1.16 FUTURE OUTDOOR SENSOR
This setting enables and disables an outdoor sensor if it
is present. The setting will be held NA if a sensor is not
present, and will be reset to NA If the sensor is discon-
nected for any reason, including removal of the thermo-
stat from its base-plate, the thermostat will automatically
disable the sensor changing the setting in this menu
from ON to NA. With an outdoor sensor present and
enabled, the outdoor temperature will be displayed alter-
nately with time. The word OUT will be visible to the right
of the temperature while the outside temperature is dis-
played.
3.7.1.17 INTERNAL TEMPERATURE SENSOR
This setting enables and disables the thermostats internal
temperature sensor. It may only be disabled if there are
indoor remote sensors present and enabled.
3.7.1.18 FUTURE INDOOR REMOTE SENSOR 1, 2, 3
Used to enable and disable the respective remote sensors
in a system. When more than one indoor sensor is used,
the values of their measurements are averaged for use in
temperature control.
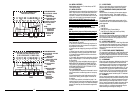
3.7.2 INSTALLER SETUP MENU WITH FURNACE SYS-
TEM TYPE SELECTED:
Menu
Item Display Selections Default
01 System Type Furnace / Heat Pump Furnace
02 Heat Stages 0 – 2 2
03 Compressor Stages 0 – 2 2
04 Modes Heat-Off *
Cool-Off *
Heat-Off-Cool *
Heat-Off-Cool-Auto *Heat-Off-
Cool-Auto
05 Minimum Run Time 1 to 5 min 4 min
06 Deadband 3°F(1°C) to 5°F(3°C) 3°F(1°C)
07 Swing 1 0.25°F(0.15°C) to 2.25°F(1.25°C) 0.25°F(0.15°C)
08 Swing 2 0.25°F(0.15°C) to 2.25°F(1.25°C) 0.5°F(0.3°C)
09 Heat Fan Control Gas / Electric Gas
10 Heat Fan On Delay 0, 15, 30…180 sec 0 sec
11 Heat Fan Off Delay 0, 15, 30…180 sec 0 sec
12 Cool Fan On Delay 0, 15, 30…180 sec 0 sec
13 Cool Fan Off Delay 0, 15, 30…180 sec 0 sec
14 Outdoor Sensor (future) NA/ON/OFF NA/OFF
15 Internal Temp Sensor
(future) ON/OFF ON
16 Remote Sensor 1
(future) NA/ON/OFF NA/OFF
17 Remote Sensor 2
(future) NA/ON/OFF NA/OFF
18 Remote Sensor 3
(future) NA/ON/OFF NA/OFF
3.7.3 INSTALLER SETUP MENU WITH HEAT PUMP
SYSTEM TYPE SELECTED AND OUTDOOR FUTURE
SENSOR ENABLED:
Menu
Item
Display Selections Default
01 System Type Furnace / Heat Pump Furnace
02 Heat Stages 0 – 1 1
03 Compressor Stages 0 – 2 1
04 Modes Heat-Off *
Cool-Off *
Heat-Off-Cool *
Heat-Off-Cool- *Heat-Off-Cool-
Em Heat-Auto Em Heat-Auto
05 Minimum Run Time 1 to 5 min 4 min
06* Heat Pump Lockout ON, OFF Off
07* Heat Pump
Lockout Temperature 0°F- 50°F(-17°C-10°C) 0°F(-17°C)
08 Deadband 3°F(1°C) to 5°F(3°C) 3°F(1°C)
09 Swing 1 0.25°F(0.15°C) to 2.25°F(1.25°C) 0.25°F(0.15°C)
10 Swing 2 0.25°F(0.15°C) to 2.25°F(1.25°C) 0.5°F(0.3°C)
11 Heat Fan Control Electric Electric
12 Heat Fan On Delay 0, 15, 30…180 sec 0 sec
13 Heat Fan Off Delay 0, 15, 30…180 sec 0 sec
14 Cool Fan On Delay 0, 15, 30…180 sec 0 sec
15 Cool Fan Off Delay 0, 15, 30…180 sec 0 sec
10