


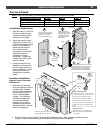

24 Maintaining Your Appliance
© Travis Industries 100-01163 4041129
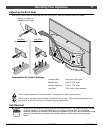
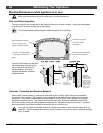
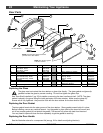
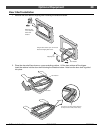
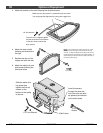
Door Parts
9/16" Wrench
5
10
8
9
12
7
6
3
4
1
2
11
NOTE: Place the glass gasket around the
perimeter of the door retainer.
NOTE: Glue the door gasket
to the door retainer.
# 20 Torx Driver
13
14
1/8” Hex Wrench
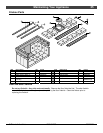
ID # Description Qty Part # ID # Description Qty Part #
1 Door Shell - Black
Door Shell - Brass
Door Shell - Pewter
1 230-00578
230-00579
230-00577
2Glass (19-1/4" x 9-7/8")1173-01001
3Glass Gasket1224-11086 4 Door Retainer (w gasket) 1 224-23029
5 Gasket Cement 1 99900409 6 Door Gasket 1 99900406
7 Door Handle Asbly - Black
Door Handle Asbly - Brass
Door Handle Asbly - Pewter
1 224-14042
99900410
224-14052
8 Spring - Black
Spring - Brass
Spring - Pewter
1 100-14122
99300100
100-04103
9Washers2100-03501 10 Cam 1 99900417
11 Nut, Brass 1 101-00007 12 Glass Clips - Top
Glass Clip - Bottom
2
1
224-230022
224-230021
13 #8-32 3/8" Type F Screw 8 225-20039 14 Set Screw 2 225-20038
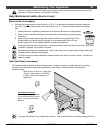
Replacing the Glass
The glass must not contact the door retainer or glass clips directly. The glass gasket and glass clip
gaskets insulate the glass to prevent cracking. Do not over-tighten the glass clips.
See "Door Shell Installation" (pg. 29) for details on removing the door handle and shell. NOTE: The glass
gasket is placed in the grove along the inside perimeter of the door retainer. Make sure the glass clip
screws are all fully tightened - they must be flush with the door retainer for the door shell to install.
Replacing the Door Gasket
The door gasket inserts into the outer groove of the door retainer. Stove gasket cement holds it in place.
Before installing, remove any residual cement. Lay the gasket in place (start at the lower left corner) and
cut off any excess gasket (do not stretch the gasket. The cement fully cures with heat from the stove.
You may need to open and close the door repeatedly to get the gasket to seat fully.
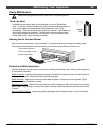
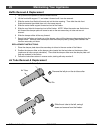
Replacing the Door Handle
See the illustration above for a component list (see pg. 24 for details on adjusting the door).