


Installation & Operation Manual
58
10 Start-up
Configuration of the cascade
Set clock
NOTICE
The internal clock does not adjust for
Daylight Savings Time and therefore,
will require a manual adjustment.
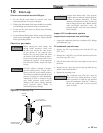
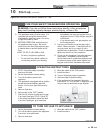
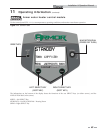
The SMART SYSTEM control has a built-in clock that it
uses for its night setback feature and for logging events. This
clock must be set when the water heater is installed, and
anytime the water heater has been powered off for more than
4 hours. Use the following procedure to set the clock:
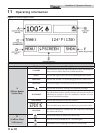
1. Press and hold the LEFT SELECT [MENU] key for at
least 5 seconds.
2. The display changes to read [PASSWORD],
with four (4) zeros below it.
3. Press the RIGHT SELECT [SAVE] key.
4. The display will then show a menu with the time and
date and temperature unit.
5. Press the NAVIGATION dial twice.
6. Turn the NAVIGATION dial to adjust the hours. Press
the NAVIGATION dial.
7. Turn the NAVIGATION dial to adjust the minutes. Press
the NAVIGATION dial.
8. Turn the NAVIGATION dial to adjust the month. Press
the NAVIGATION dial.
9. Turn the NAVIGATION dial to adjust the date. Press the
NAVIGATION dial.
10. Turn the NAVIGATION dial to adjust the year. Press the
RIGHT SELECT [SAVE] key.
11. Press the RIGHT SELECT [HOME] key.
Please note that the brackets ([]) denote
screen status.
NOTICE
Please note that the brackets ([]) denote
screen status.
NOTICE
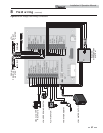
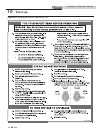
When installed in a Cascade system, the individual controls
must be programmed for cascade operation. This is
accomplished by accessing the control parameters.
Press the [MENU] key for at least five (5) seconds. Input
the Installer code as described in the Armor Service Manual.
Once the control parameters have been accessed, use the
NAVIGATION dial to select the Control Mode parameters.
Press the NAVIGATION dial to access these parameters.
Rotate the NAVIGATION dial to select the parameter
“Cascade Address”. Press the NAVIGATION dial to access
this parameter. Each appliance in the Cascade system must
be programmed with its own address. The water heater
designated as the Leader will have an address of 0. The
remaining water heaters in the Cascade will be Members and
have addresses from 1 - 7. Rotate the NAVIGATION dial
to select the appropriate address. Press the RIGHT SELECT
[SAVE] key. If installing the water heaters in an existing
system, the new water heaters should be programmed as the
Leader and/or the higher number addresses.
Press the RIGHT SELECT [HOME] key to upload the
address into the control. Repeat this procedure for all water
heaters in the Cascade, designating the Leader control and the
Member controls.
Note: A tank sensor must be installed when operating Armor
water heaters in Cascade.