


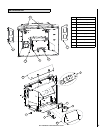
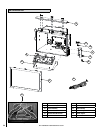
NOTE: DIAGRAMS AND ILLUSTRATIONS ARE NOT TO SCALE
Glass Door
Only doors certified with the appliance shall be used.
Seules des portes certifiées pour cet appareil doivent être
utilisées.
CAUTION: DO NOT abuse glass door by striking or slamming
shut.
Do not remove glass door while the appliance is hot.
NOTE: BE CAREFUL NOT TO SPRAY COMMERCIAL GLASS
CLEANER WITH AMMONIA ON GASKET AREA OF DOOR. AM-
MONIA WILL DISSOLVE GASKET GLUE.
NOTE: GOLD PLATED SURFACE MUST BE CLEANED WITH GLASS
CLEANER AND SOFT RAG BEFORE FIRING THE FIRST TIME OR
FINGER PRINTS AND STAINS WILL REMAIN PERMANENTLY.
NEVER USE BRASS POLISH TO CLEAN GOLD, THIS WILL RE-
MOVE GOLD PLATING!
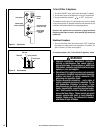
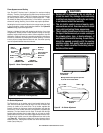
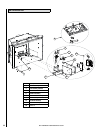
Glass Door Removal
Do not remove the glass door while the insert is hot. To remove the glass
door, pull forward and up on the top latches. Lift the glass door up and
off the lower spring latch. Be careful not to damage or scratch the glass
while handling. To reinstall the glass, reverse the removal steps. Do not
operate the insert with the glass removed.
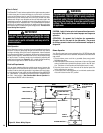
WARNING
• Do not attempt to substitute the materials used
on these doors, or replace cracked or broken
glass.
• Handle this glass with extreme care! Glass is
susceptible to damage – Do not scratch or handle
roughly while reinstalling the glass door frame.
• The glass door(s) of this appliance must only be
replaced as a complete unit as provided by the
manufacturer. Do not attempt to replace broken,
cracked or chipped glass separately.
• Do not attempt to touch the front enclosure glass
with your hands while the appliance is in use.
WARNING
Do not operate appliance with the glass front
removed, cracked or broken.
AVERTISSEMENT
Ne pas utiliser l'appareil si le panneau frontal en
verre n'est pas en place, est craqué ou brisé.
Glass Maintenance
Cleaning: Note: Clean glass after first two weeks of operation (after
Burn-In period is over).
The viewing glass should be cleaned periodically to remove any build-ups
caused from the following:
• During start-up, it is normal for condensation to form on the inside
of the glass (this condensation and fog will usually disappear in a few
minutes). This can cause lint, dust and other airborne particles to cling
to the glass surface.
• Initial curing of the high temperature paint and burning off of lubricants
used in the manufacturing process may result in a film on the glass.
• A white coating may form on the glass as a result of impurities and minerals
in the fuel.
It is recommended that the glass be cleaned two or three times during
each heating season, depending on the circumstances present.
Use one of the following to clean glass:
• Non-ammonia based household cleaner
• 50%-50% mix of white vinegar and water
• gas stove glass cleaner
Replacement: The glass in the appliance door cannot be replaced
separately. Should the glass be damaged, the entire glass, gasket, and
metal frame assembly must be replaced as a unit. This replacement glass
assembly is available from your Lennox Hearth Products dealer. The glass
is neo-ceramic and alternative types must not be used.
Small Area Paint Touch-up
The finish of the insert body and surround is a high-temperature stove
paint. Only use factory supplied high-temperature paint for touch-ups,
cat. no. 70K99.
Do not attempt to repaint the insert until the finish is completely cured
(see Burn-In Period on Page 24). If the surface later becomes stained or
marred, it may be lightly sanded and touched up with spray paint.
Paint is available at your local authorized Lennox Hearth Products dealer.
Never attempt to paint a hot insert.
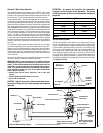
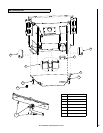
Inspect Wiring
Inspect and clean all wire connections. Ensure that there is no melting
or damage. Inspection should include:
• Terminals at the valve
• On/Off switch
• Wall thermostat, remote control, or wall switch
kit (optional parts)
Refer to wiring diagrams on Pages 24 and 25.
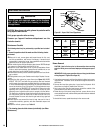
Fuel and BTU Conversion
Converting your Shoreline™ gas insert between natural gas (40,000-
33,000 BTU’s) and LP (37,500-33,000 BTU’s) can be accomplished by
installing a conversion kit (valve regulator just for fuel conversion and
burner orifice). Only a qualified service technician should perform the
conversion.
Fuel Conversion Kits
Please see instructions provided with conversion kit. See Page 36 for
ordering information.
27