


14
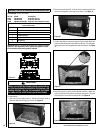
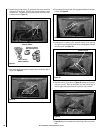
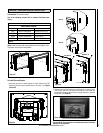
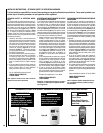
4. Slide the top panel in place with the detailed side down. Make sure
panel is positioned all way back and resting on side panels. Top panel
should be flush in front with the side panels. See Figure 18.
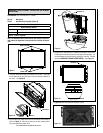
3. Position and slide the side panels against the rear panel. Make sure
panels are behind brackets to hold them in at the top. The side panels
will hold the rear brick panel against the back of the firebox. See Figure
17.
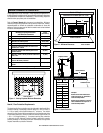
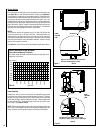
B
C D
A
2. Next place the rear panel (B). It will set on the bracket mounted to the
blower mounting plate on the back of the firebox. See Figure 16.
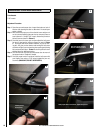
To Install Panels:
1. Start with the front bottom panel A. Set the front bottom panel in
place with detail side facing up as shown. See Figure 15.
E
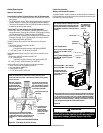
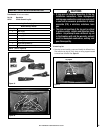
CAUTION
Before you install the refractory brick panels and log
set, the insert should be installed in the fireplace, the
venting attached, the gas line connected and tested
for leaks and the initial burner operation checked.
Figure 15
Figure 16
Figure 17
Figure 18
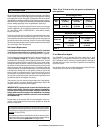
Refractory Brick Panel Kits - Packaging List
Models SHR33 & SHR40
Quantity Description
1 Front Bottom Panel (A)
1 Rear Panel (B)
1 Left Side Panel (C)
1 Right Side Panel (D)
1 Top Panel (E)
Table 7 - (refer to Figure 14)
Tools Needed: No tools are needed
Cat. No. Model Description
H7987 SHR-BRK-STD Brick Panel Set, Tan
H7988 SHR-BRK-RED Brick Panel Set, Red
H7989 SHR-BRK-ARCHSTONE Brick Panel Set, Architectural (shown)
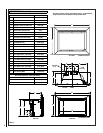
NOTE: DIAGRAMS AND ILLUSTRATIONS ARE NOT TO SCALE
SHORELINE™ REFRACTORY BRICK INSTALLATION INSTRUCTIONS
IMPORTANT NOTE: A refractory brick panel kit is required for proper
operation (sold separately). Never operate this appliance without
all the refractory brick panels properly installed.
B
A
D
C
E
Figure 14