


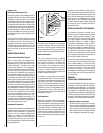
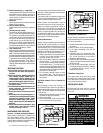

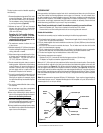

REFRACTORY REPLACEMENT
The intense heat of the fire will normally cause
hairline cracks in the refractory. These cracks
can be minimized by proper curing as described
in “First Fires”. They will not normally dimin-
ish the effectiveness of the refractory. If large
cracks develop, then the refractory should be
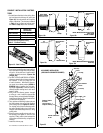
replaced. To replace the refractory bricks, fol-
low these steps:
1. Remove the front refractories
2. Remove the bottom refractory
3. Remove the left side refractory
4. Remove the right side refractory
5. Remove the back refractory
6. Remove the front ceramic baffle
7. Remove the rear ceramic baffle
To install the new refractories, follow the above
steps in reverse.
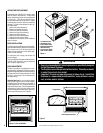
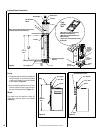
DOOR INSTALLATION
The door must be installed only when the instal-
lation of the Brentwood™ fireplace is completed.
All you have to do is fit the male part of the
hinge, already on the door, to the female part,
which is on the fireplace.
To remove the door, simply pull the door up
from the hinges.
The door adjustment has been set at the factory.
If the fit is still not perfect, you can adjust the
door using the hinge screws.
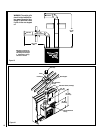
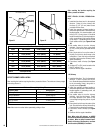
DOOR ADJUSTMENT
The door may need to be adjusted to be com-
pletely airtight. The gaskets’ air-tightness can be
adjusted using the adjustment screw located on
the right side of the fireplace facade (An Allen
key #1/8 – not supplied - will be necessary for
this adjustment).
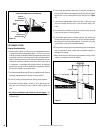
Checking Door Seal - A one-inch strip of paper
may be used to perform a test of the integrity
of the door seal. Close the door on the paper in
at least eight points. It is normal to feel only a
slight amount of friction. The door gasket does
not need to be “tight” in all areas, since a small
amount of leakage is not hazardous or detrimen-
tal to the performance of your fireplace.
Figure 3
Figure 4 - Door Installation
Figure 5
Hinge Screws
Gasket Adjustment Screw
1
2
3
7
6
5
4
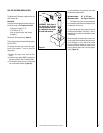
WARNINGS
•
Use only a Lennox Hearth Products glass doors, specifically designed
for the Brentwood fireplace.
•
The fireplace cannot be operated without a door. Consult your dealer
to select the correct door model.
•
Important! To assure proper alignment of glass doors: Install this
fireplace in a square and plumb condition, using shims as neces-
sary at sides and/or bottom.
1. Front Refractories
2. Bottom Refractory
3. Left Side Refractory
4. Right Side Refractory
5. Back Refractory
6. Front Ceramic Baffle
7. Rear Ceramic Baffle
NOTE: DIAGRAMS & ILLUSTRATIONS ARE NOT TO SCALE.
6