


11
ENGLISH
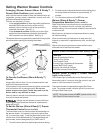
Use caution with the Timed Bake and
Delayed Start (Delayed Timed Bake) features. Foods that
can easily spoil such as milk, eggs, fish, meat or poultry,
should be chilled in the refrigerator first. Even when chilled,
they should not stand in the oven for more than 1 hour
before cooking begins, and should be removed promptly
when cooking is completed.
To Set the Timed Bake and Delay Start
Features (Delayed Timed Bake)
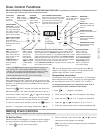
The COOK TIME and DELAY START pads
operate the features that will turn the oven ON and OFF at
the times you select in advance. The oven can be
programmed to start immediately and shut off automatically
(Timed Bake) or to begin baking at a later time with a
delayed start time (Delay Timed Bake).
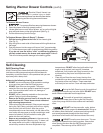
To Program the Oven to Begin Baking Immediately
and To Shut Off Automatically (Timed Bake):
1. Be sure that the clock shows the correct time of day.
2. Place the food in the oven.
3. Press . " — — — ° " appears in the display.
4. Within 5 seconds, press the or . The display will
show "350°F (177°C)." By holding the or , the
temperature can then be adjusted in 5°F increments
(1°C if the control is set to display Celsius).
5. Press . "0:00" will flash in the display (HR:MIN).
6. Press the or until the desired baking time
appears in the display.
7. The oven will turn ON and begin heating.
To Program Oven for a Delayed Start Time and to
Shut-Off Automatically (Delayed Timed Bake):
1. Be sure that the clock shows the correct time of day.
2. Place the food in the oven.
3. Press . " — — — ° " appears in the display.
4. Within 5 seconds, press the or . The display
will show "350°F (177°C)." By holding the or ,
the temperature can then be adjusted in 5°F increments
(1°C if the control is set to display Celsius).
5. Press . "0:00" will flash in the display (HR:MIN).
Note: During Timed Bake the preheat indicator light will
not function.
Setting Oven Controls (cont’d)
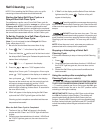
To set Control for Oven Lockout feature:
1. Press
and hold for 3 seconds. “Loc” will appear in
display, the “Door Locked” indicator light will flash and
the motor driven door lock will begin to close
automatically. DO NOT open the oven door while the
indicator light is flashing. Allow about 15 seconds for
the oven door to lock. Once the oven door is locked, the
current time of day will appear in the display.
2. To cancel the Oven Lockout feature, press
& hold
for 3 seconds. The control will unlock the oven door &
resume normal operation.
6. Press the
or until the desired baking time
appears.
7. Press . The earliest possible start time will appear
in the display.
8. Press the or until the desired start time appears
in the display.
9. Once the controls are set, the control calculates the
time when baking will stop in order to start at the time
you have set.
10. The oven will turn ON at the delayed start time and
begin heating.
When the Set Bake Time Runs Out:
a. "END" will appear in the display window and the oven
will shut-off automatically.
b. The control will beep 3 times every 60 seconds until
is pressed.
To Change the Oven Temperature or Bake Time after
Baking has Started:
1. Press the function pad you want to change.
2. Press the or to adjust the setting.
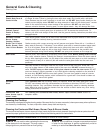
To Set for Broiling:
1. Arrange the oven rack while oven is still cool. Position
the rack as suggested in the Broil Rack Position
Table below.
2. Press . " — — "will appear in display.
3. Press and hold the or until the desired broil
setting level appears in the display. Press the for HI
broil or the for LO broil. Most foods may be broiled
at the HI broil setting. Select the LO broil setting to
avoid excess browning or drying of foods that should be
cooked to the well-done stage.
4. For optimum browning, preheat broil burner for 3 -
4 minutes before adding food.