


m
i
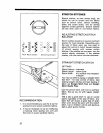
BuI"rONHOLE MAKING - BUILT-IN
SYSTEM
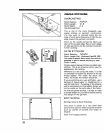
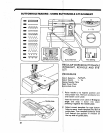
PREPARATION
Carefully mark the buttonhole length on your
garment. Place the fabric With the buttonhole
marked under the buttonhole foot. Pull the
guide foot (A) all the way forward so that the
index mark (B) is aligned With the graduation
(C), with thread to rear. (Reproduction of the
identical size buttonholesi is facilitated with
the aid of the graduations on the both sides
of the buttonhole guide fOot. These gardua-
tions are 1/8" (left side) ori2.5mm (right side)
apart. Graduations act as reference mark.)
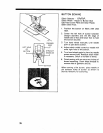
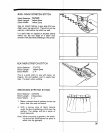
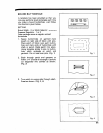
PROCEDURE
.
,
Switch the control to left. (If it has been
already at left, set it a! right, sew several
stitches and switch to lieft again.) Step on
foot control to form first bartack and left
side of buttonhole.
When you reach end of left side, switch
the control to the right and complete the
buttonhole.
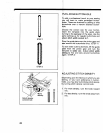
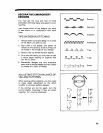
ADJUSTING STITCH BALANCE
Stitch length difference s in forward and
reverse stitches of the buttonhole are
equalized with the stitch modifier.
If the reverse stitches areitoo far apart, turn
the, modifier slightly clockwise; if they are too
close together, turn counter-clockwise.
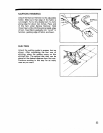
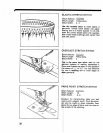
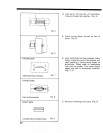
CORDED BUTTONHOLES
Hook filler cord (crotchet thread or button-
hole twist) to the spur (A), pull both ends of
cord forward under foot and tie to the spur
(B). Sew buttonhole in such a way that
zigzag stitches cover the icord.
When stitching is completed, release cord
from foot, pull ends of co_d and snip off extra
length.
, I,InI_I!.I,I.IL!
_! .
C
B A
4O