


Heatilator • I80 CAN-US • 4013-203 Rev F • 04/08
13
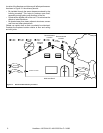
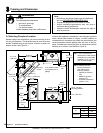
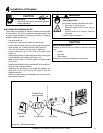
A. Install the Outside Air Kit
The outside air assembly is factory installed on the left side
of the fi replace. The kit is an optional component and its use
is highly recommended to minimize the effect of negative
pressure within the structure.
• Use short duct run.
• A small dip in the duct will create a cold air trap.
• Position the outside air inlet in a manner that will now allow
snow, leaves, etc. to block the inlet. See Figure 4.3.
• You may run the duct vertically; refer to Figure 4.2.
• Locate outside air kit on left side of fireplace. See
Figure 4.1.
• Check the operation of the outside air inlet by moving the
control handle up and down. See Figure 4.4.
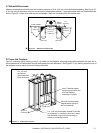
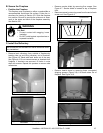
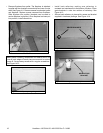
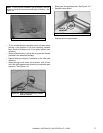
• Mark and cut out a 4 in. (102 mm) hole in the building side
for air entry.
• Install the hooded air inlet in the sidewall of the structure,
fl ush with the building’s exterior.
• Assemble the fl exible duct (not supplied) between the
collar and the air inlet. Secure into position with the
supplied wire ties.
• Check for light leaks with a fl ashlight and seal with duct
tape and/or insulation.
Risk of Smoke Spillage
Outside air inlet must be located to prevent blockage
from:
• Leaves
• Snow/ice
• Other debris
Blockage may cause combustion air starvation.
CAUTION
Sharp Edges
• Wear protective gloves and safety glasses
during installation.
CAUTION
4
4
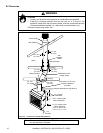
Installation of Fireplace
Fire Risk
Asphyxiation Risk
Do not draw outside combustion air from:
• Wall, fl oor or ceiling cavity.
• Enclosed space such as an attic or
garage.
• Close proximity to exhaust vents or
chimneys.
Fumes or odor may result.
WARNING
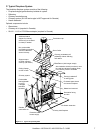
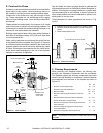
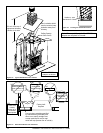
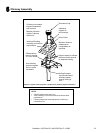
Outside Air
Shield
2 Wire Ties
Flexible Duct
(not supplied)
Inlet Ring
Figure 4.1 Outside Air Installation
¨