


R
Page 26
September 1, 2008
Cumberland Gap Wood Stove
7006-188E
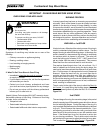
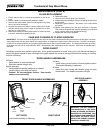
1. Ensure that the fire is out and the appliance is cool to the
touch.
2. Protect a table or counter top with padding or towels.
3. Remove door with broken glass from the appliance by lifting
door up and off of the hinges.
4. Lay door face down on a table or counter making sure handle
and fiber handle hang over the edge of the table top so door
lays flat, on a soft surface.
5. Remove the screws from each glass retainer. If screws are hard
to remove, soak with penetrating oil first.
WARNING! DO NOT OPERATE
THE WOODSTOVE IF THE DOOR
GLASS IS BROKEN OR MISSING.
DANGEROUS OVERFIRING CAN
OCCUR WHICH CAN DAMAGE THE
APPLIANCE OR IGNITE CREO
-
SOTE IN THE CHIMNEY, POSSIBLY
CAUSING A HOUSE FIRE.
MAINTENANCE (Cont'd)
GLASS REPLACEMENT
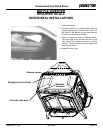
DOOR GASKET
Periodically check the door gasket for proper seal. As the gasket compresses or “seats” during use, it may become necessary to
replace the gasket material as wear or damage to the gasket material can cause air leakage into the firebox resulting in overfiring
and loss of efficiency.
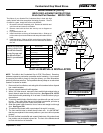
DOOR HANDLE ASSEMBLIES
SIDE DOOR HANDLE
ASSEMBLY
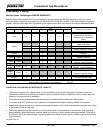
CARE AND CLEANING OF PLATED SURFACES
IMPORTANT: You must clean all the fingerprints and oils from the plated surfaces before firing the stove for the first time. Use warm
soapy water and a soft rag, glass cleaner and a paper towel, or vinegar and a paper towel to remove the oils. DO NOT use abrasive
cleaners! If not cleaned properly prior to lighting the first fire, the oils can cause permanent stains. The plating will be cured upon firing
of the stove and oils will no longer affect the finish. Subsequently, little maintenance is then required. Wipe clean as needed with a
soft towel.
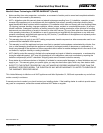
FRONT DOOR HANDLE ASSEMBLIES
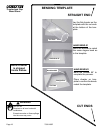
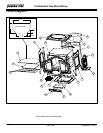
6. Remove the glass.
7. Use only 5mm ceramic glass, Part 7004-025.
8. Position the glass with edges evenly overlapping the opening in
the front door.
9. Replace the glass retainers. Be careful not to cross thread
the screws.
10. Tighten each retainer just a few turns until each is secured.
Then continue to tighten each retainer alternately, a few turns at
a time, until the glass panel is tightened snugly.
11. Replace the door on the appliance.
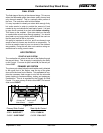
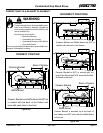
All Doors
• Install washer on door handle shaft.
• Slide door handle through door.
Right & side door:
• Install additional spacing washer(s) as needed.
• Install bushing, door latch and locknut.
Caution! Do not overtighten locknut. Door handle
needs to move smoothly.
Left door:
• Install locking pin and locknut. Securely tighten locknut.
This handle assembly is stationary.
All doors
• Insert fiber door handle with threads going into door
handle shaft. Turn handle clockwise until tight.
Fiber Handle
Handle
Washer
Spacing Washers
Lock
Nut
Door
Latch
Bushing
Lock Nut
Locking Pin
Washer
Door
Handle
Shaft
Fiber
Handle
LEFT DOOR
RIGHT DOOR
Left Handle Assembly is Stationary