


Page 15
January 30, 2004
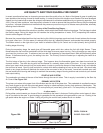
5100-I WOOD INSERT
R
250-1960 Rev B
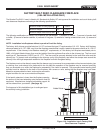
STANDARD Size: 30-1/2” h x 47”w
831-1452, Gold Trim
SP-51S-NL, Nickel Trim
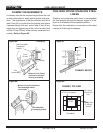
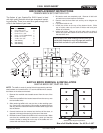
Figure 15A
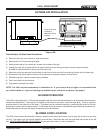
Figure 13B
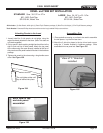
Do not tighten sides until
top is locked into place
Panel brackets
View of "L" Bracket
installed
Kit Includes: (
2) Side Panels, left & right; (1) Panel Top & Fastener package; (2) Side Trim, left & right; (1) Trim Top & Fastener package.
Tools Needed: Powered Phillips head screw driver and a long handled Phillips screw driver .
1.
Loosely install the 2 side panels, do not tighten, using the
cage nuts already attached to the stove. (Note: The sides are
not interchangeable).
2. Put top panel in place pushing straight back and then to the
right to lock onto top of side panels. Attach the top panel
to the sides using the screw already installed at the top of
side panels and the panel brackets included in the fasteners
package.
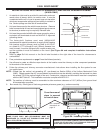
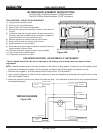
3. Tighten side panels to the stove using a long handle screw
driver. See Figure 15B.
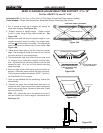
Figure 15C
Back view of top
and side panel
assembled
PANEL and TRIM SET INSTALLATION
Attaching Panels to the Insert
LARGE Size: 34-1/4” h x 51-1/4”w
831-1461, Gold Trim
SP-51l-NL, Nickel Trim
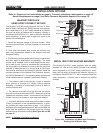
1. Place protective covering on surface to be used to assemble
the trim pieces. Lay the trim face down.
2. Attach the 2 side trim pieces to the top trim at each corner
using the “L” bracket included in fasteners package. Slide
assembled trim over panel set. See Figure 15C.
Assembling Trim