


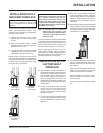
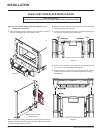
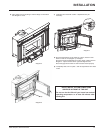

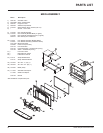
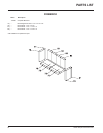

HI200 Hampton Wood Cast Insert 15
FIRST FIRE
When your installation is completed and in-
spected, you are ready for your fi rst fi re.
1) Open draft control fully.
2) Open fi rebox door and build a small fi re using
paper and dry kindling, wait a few minutes
for a good updraft in the fl ue to establish the
fi re. Leaving the door slightly open will help
your fi re start more rapidly.
CAUTION: Never leave unit unattended
if door is left open. This procedure is for
fi re start-up only, as unit may over-heat
if door is left open for too long.
3) With the draft still in the fully open position,
add two or three seasoned logs to your fi re.
Form a trench in the ash bed to allow air to
reach the rear of the fi rebox prior to closing
the door.
4) After about 15 to 20 minutes, when your
wood has begun to burn strongly, adjust
your draft control down to keep the fi re at a
moderate level.
WARNING: Never build a roaring fi re in
a cold stove. Always warm your stove
up slowly!
5) Once a bed of coals has been established,
you may adjust the draft control to a low
setting to operate the unit in its most effi cient
mode.
6) During the fi rst couple of hours, keep the
combustion rate at a moderate level and
avoid a large fi re until the paint is cured.
Only then can you operate the insert at its
maximum setting, and only after the metal
has been warmed.
7) For the fi rst few hours, the insert will give
off an odour from the paint. This is to be
expected as the high temperature paint
becomes seasoned. Windows and/or doors
should be left open to provide adequate
ventilation while this temporary condition
exists. Burning the insert at a very high
temperature the fi rst few times may damage
the paint. Burn fi res at a moderate level the
fi rst few days.
8) Do not place anything on the insert top
during the curing process. This may result
in damage to your paint fi nish.
9) During the fi rst few hours it may be more dif-
fi cult to start the fi re. As you dry out your fi re
brick and your masonry fl ue (if applicable),
your draft will increase.
10) For those units installed at higher elevations
or into sub-standard masonry fi replaces,
drafting problems may occur. Consult an
experienced dealer or mason on methods
of increasing your draft.
11) Some cracking and popping noises may be
experienced during the heating up process.
These noises will be minimal when your unit
reaches temperature.
12) Before opening your door to reload, open
draft fully for approximately 10 to 15 seconds
until fi re has been re-established. This will
minimize any smoking.
13) All fuel burning appliances consume oxygen
during operation. It is important that you
supply a source of fresh air to your unit
while burning. A slightly opened window is
suffi cient for this purpose.
CAUTION: If the body of your unit starts
to glow you are overfi ring. Stop loading
fuel immediately and close the draft
control until the glow has completely
subsided.
14) Green or wet wood is not recommended for
your unit. If you must add wet or green fuel,
open the draft control fully until all moisture
has been dispersed by the intense fi re.
Once all moisture has been removed, the
draft control may be adjusted to maintain
the fi re.
15) If you have been burning your insert on a
low draft, use caution when opening the
door. After opening the damper, open the
door a crack, and allow the fi re to adjust
before fully opening the door.
16) The controls of your unit should not be
altered to increase fi ring for any reason.
OPERATING INSTRUCTIONS
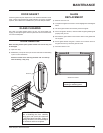
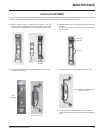
FAN OPERATION
The fan is to be operated only with the draft
control rod pulled out at least 1/2" from the
fully closed position. The fan is not to be
operated when the draft control rod is in the
closed position (pushed in). The fully closed
position is the low burn setting.
The fan must not be turned on until a fi re has
been burning for at least 30 minutes. Also note
it is recommended that the fan be turned off
before each fuel loading and again wait for 30
minutes before the fan is turned on again. This
is too allow the stove to reach it's optimum
temperature.
To operate fan automatically, push switch on
side of fan housing to "Auto" and second switch
to either "High" or "Low" for fan speed. The
automatic temperature sensor will engage the
blower when the unit is at temperature and will
shut off the blower once the fi re has gone out
and the unit has cooled to below a useful heat
output range.
To manually operate the fan system, push the
fi rst switch to "Man" and second switch to either
"high" or "Low". This will bypass the sensing
device and allow full control of the fan. Switching
from "Auto" to "Manual" or "High" to "Low" may
be done at any time.
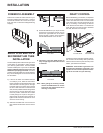
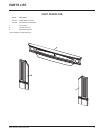
Fan Wiring Diagram