


Instructions
14 3A1495C
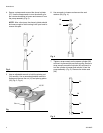
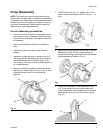
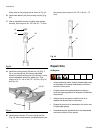
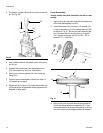
3. Pull spacer cylinder (36) away from pump to access
pin (8) (Fig. 36).
4. Use a rubber hammer and small punch to drive the
pin (8) out.
5. Unscrew the pump lower from displacement rod
(25). Set aside pump lower for reassembly.
6. Use a pick to remove gasket (30) from inside the
flange (22).
7. Continue pump disassembly instructions Steps 15 -
19, beginning on page 5.
8. Discard pin (8), air piston (15) and displacement rod
(25) according to all applicable safety regulations for
disposal of these parts.
Pump Reassembly
Always use all new parts included in the kit for reas-
sembly.
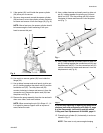
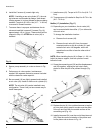
1. Apply a thin coat of grease around the threaded end
of the new displacement rod (25).
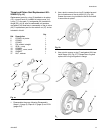
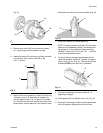
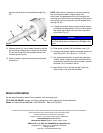
2. Assemble washer (38), air piston (15), gasket (13),
o-ring (5) and hex nut (19) to displacement rod (25)
as shown in Fig. 37. Be sure the male boss on gas-
ket (13) mates with the counter bore in air piston
(15). Tighten and torque nut (19) to 155 - 165 in.
pounds (17.5 - 18.6 N.m).
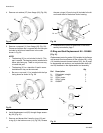
3. Apply a thin coat of grease around the chamfered
end of the displacement rod assembly (25). Push
the displacement rod through the opening in the bot-
tom cover and into the flange assembly as shown in
Fig. 36
22
36
PULL
8
30
25
Fig. 37
15
19
38
25
13
5
25
15
13
19
38