


Instructions
3A1495C 13
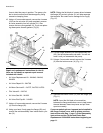
1. Disassemble the pump following Disassembly
Steps 1-14 (pages 3-5) only.
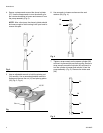
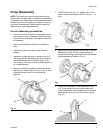
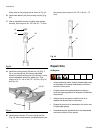
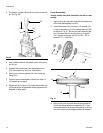
2. Use a pick to remove the gasket (30) installed
between the flange (22) and tube (36) (Fig. 32).
Grease the new gasket included in the kit and install
it inside the flange.
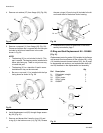
3. Use a pick to remove the other gasket (30) installed
between the cylinder (26) and tube (36) (Fig. 33).
Grease the new gasket included in the kit and install
it around the cylinder.
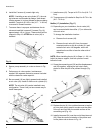
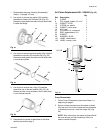
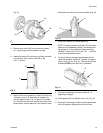
4. Use a pick to remove the o-ring (10) installed
around the top of the seal retainer (29) (Fig. 34).
Grease the new o-ring included in the kit and install
it over the seal retainer.
5. Reassemble the pump as described in the Reas-
sembly instructions, page 7.
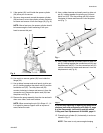
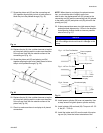
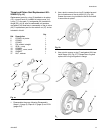
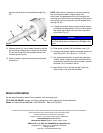
Air Piston Replacement Kit - 24U984 (Fig. 35)
Pump Disassembly,
1. Follow Pump Disassembly instructions Steps 1-3
beginning on page 3.
2. Secure a strap wrench around the spacer cylinder
(36) and use it to turn the cylinder counter clockwise
to loosen and remove it from the flange (22) (Fig.
36).
NOTE: After a few turns, the spacer cylinder should
be loose enough to finish loosening it with your
hand to remove this part.
Fig. 32
Fig. 33
Fig. 34
30
22
36
30
26
36
29
10
Ref. Description
Qty
.
5O-RING 1
8 PIN, straight, slotted, 2.5 x 16 1
13 GASKET, 32 OD 1
15 PISTON, air, plastic 1
18 GASKET, cover small 2
19 NUT, hex 1
21 CYLINDER, air, machined 1
25 ROD, displacement, 50:1 1
30 GASKET 1
38 WASHER, 32 OD 1
101 LABEL, identification 1
102 LABEL, overlay, clear 1
Fig. 35
101/102
18
21
19
13
15
5
38
25
8
18
30