


10
11
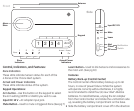
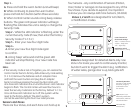
Step 2 – Press the Zone button (1, 2, 3 or 4) for the
Zone you want to assign to the Sensor. The LED
indicator for that Zone will begin to flash.
Step 3 –
Release the Zone button.
Note: Zone 4 is for dedicated alerts only. Sensors in this Zone
will not trigger an alarm or chime.
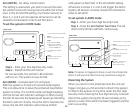
Step 4 – Activate the Sensor
- For the Window/Door Sensor, separate the two
pieces or if mounted, open the door or window.
- For the Garage Sensor, lower the detection rod to
its full extension; if mounted, raise the garage door.
- For the Water Leak Sensor, place the contacts in a
small bowl of water, or use a metal paperclip and
touch both contacts.
- For the Motion Sensor, press the Learn button
located inside the battery compartment, or if
mounted wave your hand in front of the Sensor
(red LED indicator will flash inside lens area in front
of Motion Sensor).
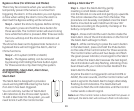
Erasing a Sensor from a Zone
Note: If you need to remove a Sensor from a Zone, the system
will erase the entire Zone, so any other Sensors will need to be
put back into that particular Zone.
Step 1 - To erase a Zone, press and hold the Learn
button on the Control Center. The unit will beep once.
Step 2 -
While holding the Learn button, press and
hold the Zone button to be erased. After five seconds
the Control Center will sound two beeps and the
Zone LED indicator will flash twice.
Step 3 - Release all buttons.
Note: The Zone/Sensor cannot be erased if:
- The Zone has been triggered for an Alert or alarm. The
Sensor/Zone must be reset.
- There is loss of signal from the Sensor to the Control
Center (such as low battery, or Sensor is out of range).
- The system is armed.
The Control Center will sound three beeps to indicate it could
not erase the Zone.
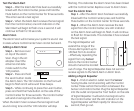
Testing a Sensor or your system
Once all the Sensors have been assigned to Zones
in the Control Center you can now test your system.
This allows you to test a Motion Sensor in Zones 1, 2, 3
without arming the system. Ensure the Control Center
can receive the signal from the intended location of the
Sensor before permanently mounting a Sensor.
Step 1 - Unplug AC adapter and remove batteries.
Step 2 - Press and hold the ‘Mute’ button and plug
the AC adapter back into the Control Center. When all
the LED indicators turn on, release the Mute button.
The Control Center is now in Test Mode and any
Sensor can now be tested in any Zone.
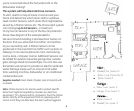
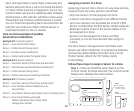
Step 3 - Set the Notification Mode to ‘Alert’ position
(see Notification Mode switch Page 6) and begin
activating Sensors one at a time.
Note: For the Motion Sensor, stand in front of the Sensor and
remain motionless for 20 seconds. Begin moving and if the
Sensor is within range of the Control Center it will activate the
Zone in the Control Center for 15 seconds.
Step 4 - When testing is complete, unplug the AC
adapter, then plug the AC adapter back in and
reinstall batteries. This returns the Control Center to
standard operation mode.
Note: The Control Center will automatically return to standard
operation mode after 5 hours.