


www.fmiproducts.com
111099-01L 9
VENTING INSTALLATION
Continued
14
3
/
8
"
(36.5 cm)
30"
(76.2 cm)
1"
(2.5
cm)
1"
(2.5
cm)
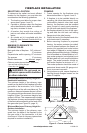
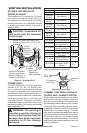
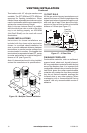
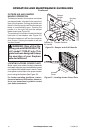
Minimum Measurements
1"
(2.5 cm)
Opening "A"
Pitch Slope Opening "A"
Max.
Used Flashing
Model No.
Flat 0° 15" V6F-8DM
0-6/12 26.6° 16
1
/
8
" V6F-8DM
6/12-
12/12
45.0° 20
3
/
8
" V12F-8DM
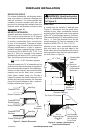
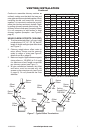
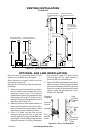
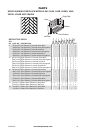
FLASHING INSTALLATION (V6F-8DM
OR V12F-8DM)
Determinetheashingtobeusedwiththeroof
openingchart.Slideashingoverpipeuntil
baseisatagainstroof.Replaceasmany
shingles as needed to cover exposed area
andashingbase.Secureinpositionbynail-
ingthroughshingles(seeFigure13).DONOT
NAILTHROUGHFLASHINGCONE.
Installing Flashing on a Metal Roof
Wheninstallingtheashingonametalroof,
it is required that putty tape be used between
theashingandtheroof.Theashingmustbe
securedtotheroofusing#8x3/4"screwsand
then sealed with roof coating to prevent leakage
through the screw holes. A roof coating must
also be applied around the perimeter of the
ashingtoprovideaproperseal.
Figure 12 - Roof Opening Measurements
NailOnly
Outer
Perimeter
ofFlashing
StormCollar
Flashing
Cone
UnderlapShingles
at Bottom
Overlap
ShinglesTop
andSidesOnly
Figure 13 - Flashing Installation
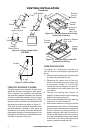
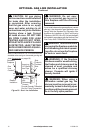
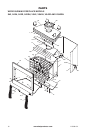
Storm Collar Installation (SC1 or SC2)
Placestormcollaroverpipeandslidedown
until it is snug against the open edge of the
ashing(seeFigure14).UseSC1forallround
terminationsandSC2forallterminations
with slip sections. Apply waterproof caulk
around the perimeter of the collar to provide
a proper seal.
Figure 14 - Storm Collar
Chimney
Pipe
Waterproof
Caulk
Storm
Collar
Flashing
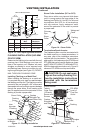
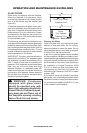
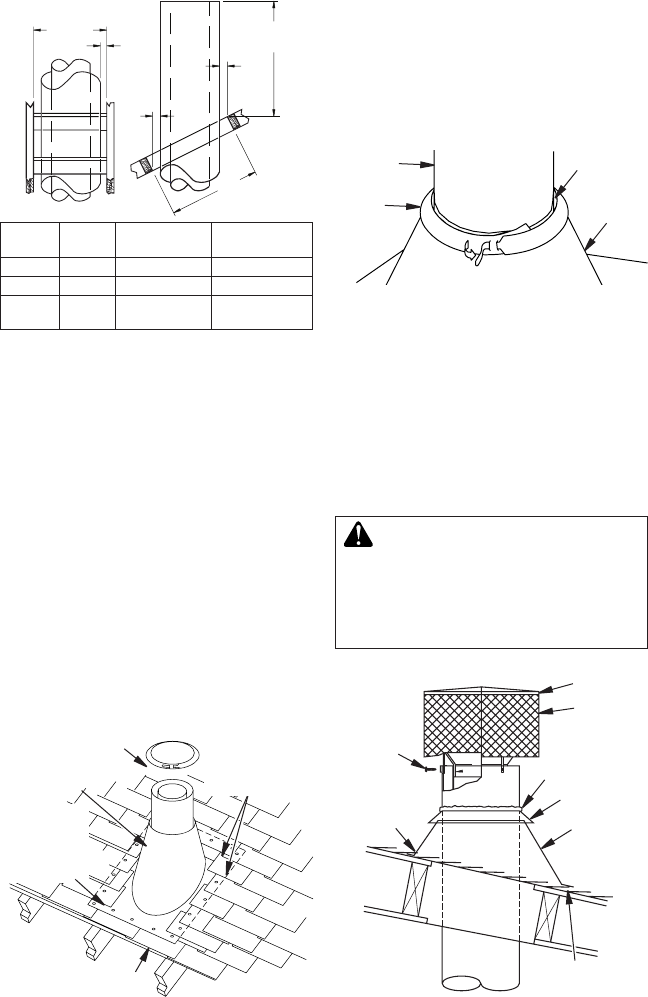
Terminations/Spark Arrestor
Thereplacesystemmustbeterminatedwith
thelistedroundtoporchaseterminations.In
any case, refer to the installation instructions
suppliedwiththetermination.Thetermination
approvedforthisreplacearetheRT-8DMand
RTL-8DMthatcanbeusedforashingorchase
andET-8DM,ETO-8DM,ETL-8DMandETLO-
8DMforchasestyleterminationonly.Figure15
showsanRTL-8DMroundtoptermination.
CAUTION: Do not seal open-
ings on the rooftop ashing. Fol-
low the installation instructions
provided with the termination
being used.
Attach Bracket
Tabsto
OuterPipe
(3Places)
Securewith
Screws
RTL-8DM
Level of
FlueGas
Outlet
Caulk
Collar
Flashing
UnderlapShingles
BottomOnly
Figure 15 - Termination
Overlap
ShinglesTop
andSides