


www.fmiproducts.com
111099-01L4
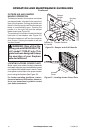
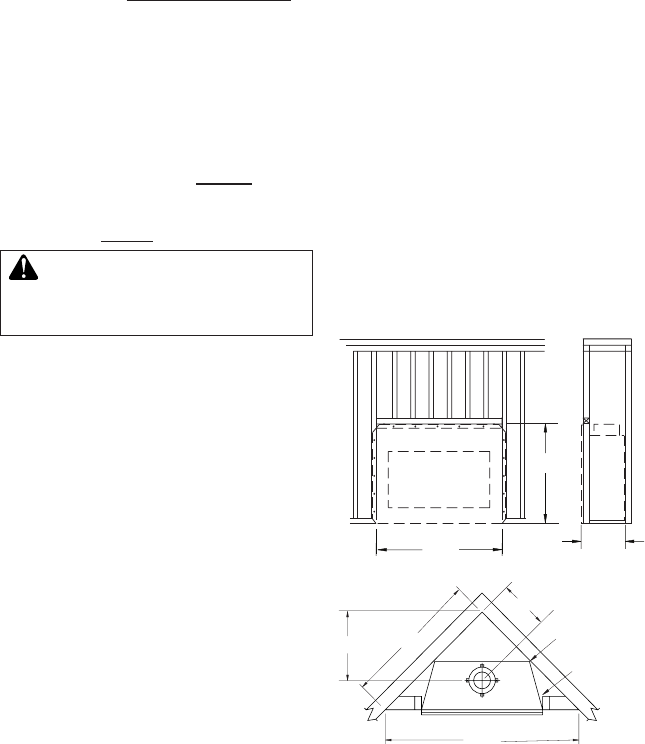
FIREPLACE INSTALLATION
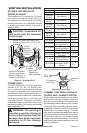
FRAMING
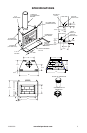
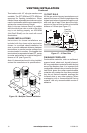
1. Frameopeningforthereplaceusing
dimensionsshowninFigures1and2.
2. Ifreplaceistobeinstalleddirectlyon
carpeting, tile (other than ceramic) or any
combustible material other than wood
ooring,thereplacemustbeinstalled
upon a metal or wood panel extending
thefullwidthanddepthofthereplace.
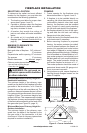
3. Setreplacedirectlyinfrontofthisopen-
ing and slide the unit back until nailing
angestouchthesideframing.
4. Checkthelevelofthereplaceandshim
with sheet metal if necessary.
5. Before securing fireplace to prepared
framing, the ember protector (provided)
must be placed between the hearth ex-
tension (not supplied) and under bottom
frontedgeofreplacetoprotectagainst
glowingembersfallingthrough.Ifreplace
is to be installed on a raised platform, a Z-
type ember protector (not supplied) must
befabricatedtotyourrequiredplatform
height.Theemberprotectorshouldex-
tendunderreplaceaminimumof1
1
/
2
".
Theemberprotectorshouldbemadeof
galvanizedsheetmetal(28gaugemini-
mum) to prevent corrosion.
6. Usingscrewsornails,securereplaceto
framingthroughangeslocatedonthe
sidesofreplace.
23.50"
43.375"
48.25"
Figure 1 - Framing Dimensions
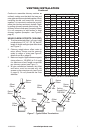
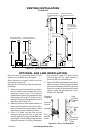
59.264"
19.466"
27.527"
83.830"
MAINTAIN
3
/
4
"
CLEARANCE AT
SIDES AND BACK
OF FIREPLACE
3
/4" CLEARANCE
NOT REQUIRED AT
NAILING FLANGES
Figure 2 - Corner Installation
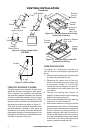
SELECTING LOCATION
Todeterminethesafestandmostefcient
locationforthereplace,youmusttakeinto
consideration the following guidelines:
1. Thelocationmustallowforproperclear-
ances(seeFigures1and2).
2. Consideralocationwherethereplace
will not be affected by drafts, air condition-
ing ducts, windows or doors.
3. A location that avoids the cutting of
joists or roof rafters will make installation
easier.
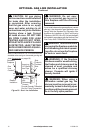
4. An outside air kit is available with this
replace(seeOptional Outside Air Kit on
page 6).
MINIMUM CLEARANCE TO
COMBUSTIBLES
Backandsidesofreplace 3/4"minimum*
Floor** 0"minimum
Perpendicularwalltoopening12"minimum
Topspacers 0"minimum
Mantelclearances seeMantels, page 5
Chimneyouterpipesurface1"minimum
*Notrequiredatnailinganges
**Seestep2ofFraming
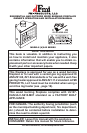
WARNING: Do not pack re-
quired air spaces with insulation
or other materials.
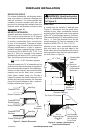
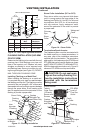
Minimum/Maximum Chimney Height for
Residential Installation
Theminimumheightofthechimney,mea-
suredfromthebaseofthereplacetotheue
gas outlet of the termination, is 14.5 feet for
straightueorauewithoneelbowset.The
maximum distance between elbows is 6 feet.
Forsystemswithtwoelbowsets,theminimum
heightis22feet.Themaximumheightofany
systemis50feet.Thismeasurementincludes
thereplace,chimneysectionsandtheheight
of the termination assembly at the level of the
uegasoutlet(seeFigure18,page11).
Minimum/Maximum Chimney Height for
Outdoor Installation
Theminimumheightofthechimney,mea-
suredfromthebaseofthereplacetothe
uegasoutletofthetermination,is8feet
(minimum of 4 feet of chimney pipe sections
required for outdoor installation).