


www.fmiproducts.com
125160-01A26
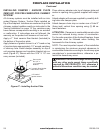
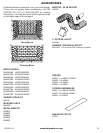
Upper Dome Sides
Upper Dome
Front/Rear
FIREPLACE INSTALLATION
Continued
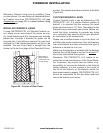
NOTE: Although you are cautioned to use mortar
sparingly because it does have such holding power,
you should look over the rebox assembly at the end
and ll in any gaps, especially joint connections, with
the mortar.
IMPORTANT: Adjustments can only be made while
the mortar is still wet when correcting for squareness
and leveling.
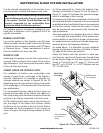
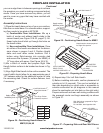
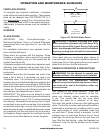
11) Assemble Lower Dome Sides as shown in Figure
46. The beveled face lines up with the inward angles
of the lintel sides. Top surfaces should be level.
Lower Dome Sides (Rating
Plate faces inside)
Figure 45 - Attaching Lower Dome Sides
As you are connecting each component, be certain
you are following the instructions given previously for
using mortar. Stop to look at the smoke dome side,
front and rear walls to see that they are aligning cor-
rectly and that the surfaces are smooth and uniform.
Make sure connections are covered with an adequate
amount of mortar. Remember that you have the op-
tion of using shims but they must be removed and
any holes lled. Make any adjustments to the re-
place alignment before continuing to the next step.
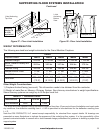
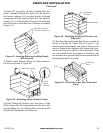
12) Assemble Upper Dome and Dome Sides as
shown in Figure 46. Check your assembly here. If
things are proceeding as they should be, the nished
top surface should be at and level.
Figure 45 - Attaching Upper Dome & Sides
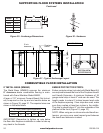
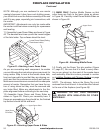
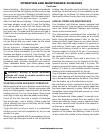
13) MM63 ONLY: Position Middle Domes so that
outer faces are ush to the lower dome as shown
in Figure 46. Carefully install Dome Middle Sides as
shown in Figure 46.
Dome Side
Upper Dome
Figure 46 - Attaching Middle Dome
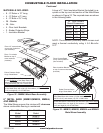
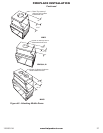
14) Finally, set the Dome Top into position (Figure
47, page 27). Be sure that it is ush in every direc-
tion as you place it on the crest of the smoke dome
wall assembly. After this is done, proceed to section
on Installing Damper and Chimney System on page
28.
NOTE: The chimney hole on the Dome Top is not
centered from front to back - it should be offset closest
to the rear of the replace (see Figure 46).
WARNING: DO NOT PACK REQUIRED
AIR SPACES WITH INSULATION OR OTHER
MATERIALS.