


www.fmiproducts.com
125160-01A22
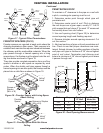
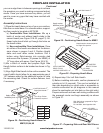
You will nd that the Grand Meridian Fireplace is de-
signed to be completely assembled on-site, consist-
ing of interlocking precast parts. Included is a thin-
set type mortar for bonding. The parts of the replace
are made of FMI’s incredibly strong blend of specialty
cement and a light weight aggregate.
IMPORTANT: When applying mortar, it is imperative
that the concrete blocks be maintained moist (not
soaking) so they don’t absorb the water out of the
mortar and cause adhesion to fail. Frequently run a
damp sponge to the parts before mortar is applied!
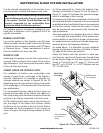
The installation of an anchor plate/damper for either
masonry chimney or pre-fabricated chimney is re-
quired but not supplied. See Accessories on page
33.
The installation of a seismic strap kit is required but
not supplied. See Accessories on page 33.
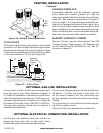
An optional outside air kit can be used. See Acces-
sories on page 33.
Refractory Firebrick Liners also need to be installed.
These should be a minimum of 1⅛" thick. The liner
will be applied within the walls and hearth area of the
rebox. See Accessories on page 33.
TOOLS NEEDED FOR INSTALLATION:
One 4 ft. level•
Roto-hammer with ½" drill bit•
Drill motor with mixer blade to mix Mortar•
Two empty 5 gallon buckets to mix Mortar•
One wheelbarrow• and shovel to mix concrete
Grout bag•
Triangular masonry trowel•
Rubber hammer•
Sponge and 2 water buckets to wipe down and •
moisten parts prior to applying mortar
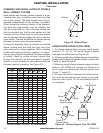
MATERIALS NEEDED FOR INSTALLATION:
Epoxy for securing rebar in footing / foundation•
Three (3) - 90 lb. bags of ready mix concrete with •
¼" or smaller aggregate
FIREPLACE INSTALLATION
MATERIALS INCLUDED:
MM33, MM39, MM44, MM49:
8 - ⅜" Rebar x 28" Long•
8 - ⅜" Rebar x 12" Long•
1 - 50 lb. bucket Mortar•
20 - Small Wood Shims•
MM63:
10 - ⅜" Rebar x 36" Long•
10 - ⅜" Rebar x 12" Long•
2 - 50 lb. bucket Mortar•
20 - Small Wood Shims•
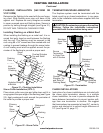
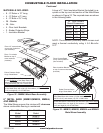
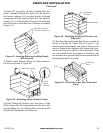
FIELD ASSEMBLY PROCEDURES
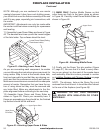
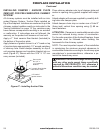
Mixing the mortar – The mortar comes pre-mixed
and should be dry. Be sure to use clean water and
work it up into a mixture that is pasty but not lumpy.
If it’s too thin and the surfaces don’t stay moist, the
components will not adhere. Load the mixture into a
standard grout bag.
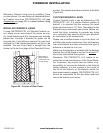
When applying, use about ½" thread of mortar. The
mortar bead should be approximately ½" away from
all edges. The mortar has a considerable amount of
holding power so do not overload the components
with too much mortar. Keep the components moist
at all times by wiping them down with a clean wet
sponge.
Some mortar will “ooze out” when placing compo-
nents together, this is normal. Wipe excess away
with a trowel. Do not cover component surfaces com-
pletely with mortar. Do not apply the mortar in thick
bands even if the component you are working with is
larger than the rest. You will want to apply “stripes” of
mortar in these situations.
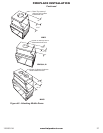
Make sure components are level. Checking lev-
elness after each layer. It’s extremely important
that you pay careful attention to how you are as-
sembling the Grand Meridian Fireplace since ev-
ery component builds on the next. If you have to
make any kind of an adjustment, do not try to do it
“by loading an opening” with mortar, this will only
result in a replace that will not be plumb or level.
Use wood shims instead. You will nd these small
wood shims supplied with the Fireplace and