


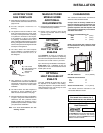

Excalibur
®
P95-3 Zero Clearance Direct Vent Gas Fireplace
8
FRAMING AND
FINISHING
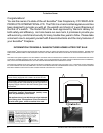
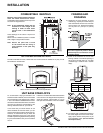
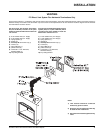
1) Determine the total thickness of facing
material (e.g. drywall plus ceramic tiles) to
allow the fi nished surface to be fl ush with
the front of the unit. Total facing thickness
can vary from 1/2" (13mm) to 1" (32mm)
thick.
Install Top Standoffs & Side Nailing Strips
before unit is slipped into position. See the
"Unit Assembly Prior to Installation" section
for assembly details.
2) Frame in the enclosure for the unit with
framing material. The framed opening is
50-1/8" high x 53-3/8" wide x 21-1/4" deep
(1276mm high x 1346mm wide x 533mm
deep).
Framing Dimensions
A B C
53-3/8" 50-1/8" 21-1/4"
1346mm 1276mm 533mm
INSTALLATION
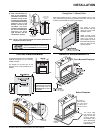
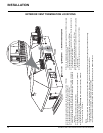
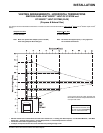
COMBUSTIBLE MANTELS
Because of the extreme heat this fi replace
emits, the mantel clearances are critical.
Combustible mantel clearances from top of unit
are shown in Diagram below.
Note: A non-combustible mantel may be
installed at a lower height if the
framing is made of metal studs
covered with a non-combustible
board.
3) For exterior walls, insulate the enclosure to
the same degree as the rest of the house,
apply vapour barrier and drywall, as per
local installation codes. (Do not insulate
the fi replace itself.)
These drawings are to scale at 1:6 (one inch
= 6 inches)
Mantel can be installed anywhere in shaded
area or higher using the above scale.
Note: Ensure the paint that is used
on the mantel and the facing is
"heat resistant" or the paint may
discolour.
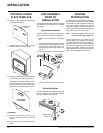
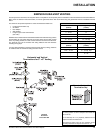
To accommodate varying thicknesses and
fi nishes of hearth materials, we have increased
the overall height of the appliance by a further
1-1/8”. This increase is added with the inclusion
of two stand-offs at the bottom of the unit, below
the outer box, taking the overall height of the
framing dimensions from 49” up to 50-1/8”.
In the event that you should choose to use
thinner materials to fi nish the hearth, you can
omit the stand-offs provided for raising the unit.
However, we recommend that you leave the
framing dimensions as they are in the manual
and alter only the facing requirement by reducing
it by the same distance that you have lowered
the unit.
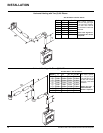
Insert the 2 unit base stand-offs underneath the
unit as shown in the diagram below. Space the
stand-offs centrally, approximately 2 or 2-1/2
feet apart. Ensure that the unit is not unstable.
P95-3 Flat Wall Surround and Tile Kit
The P95-3 Flat Wall Surround, Hearth Pad and Tile Kit cannot be modifi ed in any way. It must
be installed as manufactured.
P95-3 Flat Wall Surround and Tile Kit Specifi cations
UNIT BASE STAND-OFFS