


Initial Installation
QUALIFIED INSTALLERS ONLY
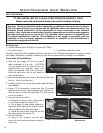
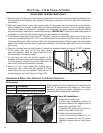
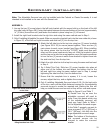
vent terminal (refer to Figure 40). Slide the Ø2”
(51mm) ex intake liner over the collar, secure the
ex liner with three (3) sheet metal screws evenly
spaced.
9. Make a tight connection between the gas replace
insert ue collar and the replace chimney at the
top of the chimney. Secure the vent terminal to the
chimney using adequate sealant, and according to
local building codes.
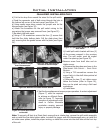
10. Light the Sonnet and ensure proper operation
and proper ame appearance. The amount of air
to the venturi may need to be adjusted using the
rod under the rebox (see Figure 7). Also refer
to Figure 77 for a ame appearance picture.
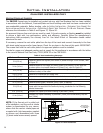
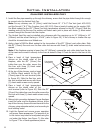
2" (51mm) Air Inlet
3" (76mm) Exhaust
Figure 40: Vertical Vent Cap Underside.
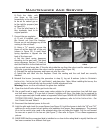
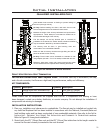
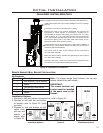
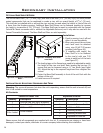
18"
(457mm)
18"
(457mm)
Trim flashing
as required.
Figure 39: Vertical Vent Cap Dimensions.
3. Install the ex pipe assembly up through the chimney, ensure that the pipe slides through far enough
to connect onto the Vertical Vent Cap.
Note: For any chimney over 15’ (4.6m), install the Sonnet 15’ 2” & 3” Flex Vent (part #50-1512)
and the Sonnet 2” & 3” Flex Couplers (part #50-1513). Place a bead of sealant on the coupler (Mill-
Pac Black sealant for the Ø3” (76mm) and high temperature silicone for the Ø2” (51mm)) Slide the
meeting ends of the ex over the coupler and fasten each joint in place with three (3) sheet metal
screws through the ex and into the coupler.
4. The Vertical Vent Cap can be installed onto chimneys with ue openings up to 16” (406mm) x 16”
(406mm) and the actual ashing is 18”x18” (refer to Figure 39). If the chimney is smaller the cap
should be trimmed down and folded over.
5. Apply a bead of Mill-Pac Black sealant to the top section of the Ø3” (76mm) vent collar plate. Slide
the Ø3” (76mm) ex vent over the ue collar and secure with three (3) sheet metal screws evenly
spaced.
Note: If the replace opening is lower than 19” (483mm), remove the vent collar plate from the top
of the insert and connect it securely to the liner as stated in Step 4. Check for tears in the liner at this
point.
6. Place a bead of high temperature
silicone on the intake collar of the
replace, slide the Ø2” (51mm) ex
intake liner over the collar, secure the
ex liner with three (3) sheet metal
screws evenly spaced.
7. At the top of the chimney, apply a bead
of Mill-Pac Black sealant to the Ø3”
(76mm) pipe of the vent terminal (refer
to Figure 40). Slide the ex liner onto
the vent terminal and secure with three
(3) sheet metal screws evenly spaced.
8. Place a bead of high temperature
silicone on the intake collar of the
22